
The car suspension bible - how car suspension works including shocks, struts, springs, raising and lowering your suspension, different types of suspension, all the technologies involved, DIY car maintenance and much more.
The Suspension Bible
Variable-camber suspension for steering

If you've read the wheel and tyre bible, you'll know that camber is the lateral tilt of the suspension (and hence the wheel and the tyre) to the road surface. Proper camber (along with toe and caster) make sure that the tyre tread surface is as flat as possible on the road surface. The problem with regular fixed-geometry suspension is that the camber is set up to be ideal when driving straight. This means that however much you dislike the idea, when you corner, less of the tyre's tread is in contact with the road surface because the tyre has to tilt slightly when the steering is turned. In 2006, OnCamber LLC patented their variable camber steering system which they launched at SEMA in Las Vegas. Matthew Kim, OnCamber's founder and president was kind enough to send some pictures of their development system which you can see here. The idea is simple - as the steering wheel is turned, the steering input shifts the top mounts of a McPherson strut type suspension system laterally. In other words, the top of the strut is no longer solidly bolted to the strut tower. When the top mount point is moved, the camber of the suspension system changes. Turn to the left, and the mounting points shift to the left tilting the wheels over to the left giving a larger contact patch whilst cornering. ie. the inside wheel tilts and goes into positive camber(almost parallel to the outside wheel), which in turn contributes to the overall grip of the car.
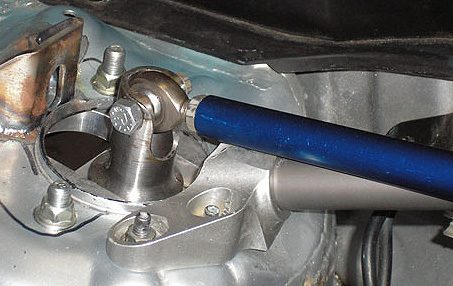
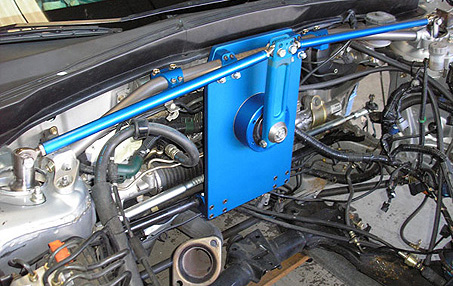
The variable camber action also gives even tyre wear. Pyrometer readings during testing have shown that the inside, mid, and outside tyre tread temperatures are all within 2° of each other. With regular fixed-camber steering, the inside of the tyre was 20° higher. OnCamber's development car is an RSX although they have designs on the table for double-wishbone variants of their system too. On the RSX testbed the camber plates are attached together by linear guides which permits them to move freely. The top connecting rods are mechanically connected to the steering rack. The degree of camber applied with steering is adjustable by varying the distance of the rods from the pivot point. ie: when the rods are mounted closer to pivot point you get more camber with less steering input. On track, this system has shaved 3 seconds off the development vehicle's lap times in race conditions. Whether this sytem will trickle down into consumer level cars is debatable. It's doubtful that a manufacturer would add this as standard but the racing and aftermarket scenes will undoubtedly welcome this development with open arms. 3 seconds off your lap time for a change of suspension components? Why wouldn't you? The images below show a camber plate at the top of one of the strut towers, and the mechanical steering linkage.
Sadly, at this point it's unclear if OnCamber are still in business.
Picture credits: Matthew Kim, OnCamber LLC
Like the site? The page you're reading is free, but if you like what you see and feel you've learned something, a small donation to help pay down my car loan would be appreciated. Thank you.
Anti-roll Bars & Strut Braces
Strut Braces
If you're serious about your car's handling performance, you will first be looking at lowering the suspension. In most cases, unless you're a complete petrolhead, this will be more than adequate. However, if you are a keen driver, you will be able to get far better handling out of your car by fitting a couple of other accessories to it. The first thing you should look at is a strut brace. When you corner, the whole car's chassis is twisting slightly. In the front (and perhaps at the back, but not so often) the suspension pillars will be moving relative to each other because there's no direct physical link between them. They are connected via the car body, which can flex depending on its stiffness. A strut brace bolts across the top of the engine to the tops of the two suspension posts and makes that direct physical contact. The result is that the whole front suspension setup becomes a lot more rigid and there will be virtually no movement relative to each side. In effect, you're adding the fourth side to the open box created by the subframe and the two suspension pillars.
 |
 |
| Simple straight brace(highlighted). | Complex brace (highlighted). |
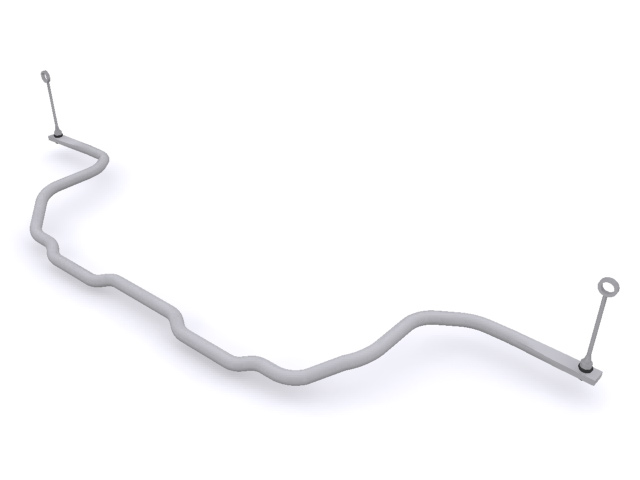
Anti-roll Bars (Sway Bars/Stabilizers)
No, these aren't the things that are bolted inside the car in case you turn it over - those are rollover cages. Anti-roll bars do precisely what their name implies - they combat the roll of a car on it's suspension as it corners. They're also known as sway-bars or anti-sway-bars. Almost all cars have them fitted as standard, and if you're a boy-racer, all have scope for improvement. From the factory they are biased towards ride comfort. Stiffer aftermarket items will increase the road-holding but you'll get reduced comfort because of it. It's a catch-22 situation. Fiddling with your roll stiffness distribution can make a car uncomfortable to ride in and extremely hard to handle if you get it wrong.
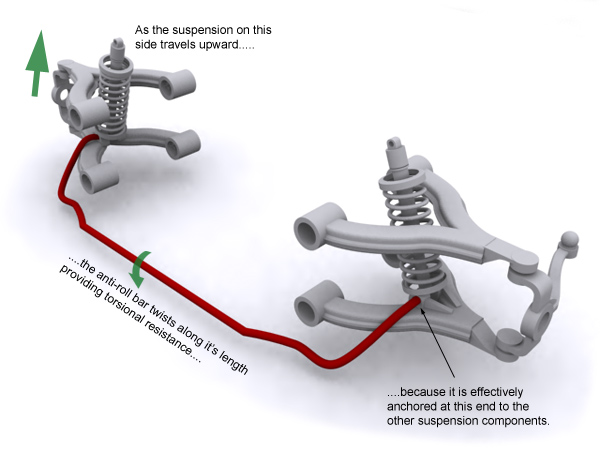
The anti-roll bar is usually connected to the front, lower edge of the bottom suspension joint. It passes through two pivot points under the chassis, usually on the subframe and is attached to the same point on the opposite suspension setup. Effectively, it joins the bottom of the suspension parts together. When you head into a corner, the car begins to roll out of the corner. For example, if you're cornering to the left, the car body rolls to the right. In doing this, it's compressing the suspension on the right hand side. With a good anti-roll bar, as the lower part of the suspension moves upward relative to the car chassis, it transfers some of that movement to the same component on the other side. In effect, it tries to lift the left suspension component by the same amount. Because this isn't physically possible, the left suspension effectively becomes a fixed point and the anti-roll bar twists along its length because the other end is effectively anchored in place. It's this twisting that provides the resistance to the suspension movement.
If you're loaded, you can buy cars with active anti-roll technology now. These sense the roll of the car into a corner and deflate the relevant suspension leg accordingly by pumping fluid in and out of the shock absorber. It's a high-tech, super expensive version of the good old mechanical anti-roll bar. You can buy anti-roll bars as an aftermarket add-on. They're relatively easy to fit because most cars have anti-roll bars already. Take the old one off and fit the new one. In the case of rear suspension, the fittings will probably already be there even if the anti-roll bar isn't.
Typical anti-roll bar (swaybar) kits include the uprated bar, a set of new mounting clamps with polyurethane bushes, rose joints for the ends which connect to the suspension components, and all the bolts etc that will be needed.
Note: with the advent of digital suspension systems, anti-roll bars are starting to be phased out on some vehicles as they can be replaced with quick-reacting electronically-controlled suspension components. I have a section on digital suspension systems here.
Variable stiffness anti-roll bars
Some sportier vehicles have the capability to stiffen up the suspension for more aggressive handling by altering how the anti-roll bar behaves. The system itself isn't especially complex. Instead of simple rubber or urethane bushes to clamp the anti-roll bar to the frame of the car, these systems use a motor-driven or electromagnetically clamped bush instead. When the driver decides they want 'sport' mode, the car can increase the friction in the mounting bushes by clamping them more tightly around the anti-roll bar. This better resists the anti-roll bar's ability to twist across the width of the vehicle, which in turn provides more resistance at the ends where it joins the suspension components. The end result is that the suspension components have to take on a lot more load to deflect by the same amount. Or conversely, under the same load, they move less, thus stiffening up the suspension.
The Ins and Outs of complex suspension units.
Generally speaking, this section will be more relevant to you if you ride a motorbike, but you can get high-end spring / shock combos for cars that have all these features on them. The thing to realise is that if you're going to start messing with all these adjustments, for God's sake take a digital photo of the unit first, or somehow mark where it all started out. It's a slippery slope and you can very quickly bugger up the ride quality of your vehicle. If you don't know what the "stock" setting was, you'll never get it back.
Compression damping.
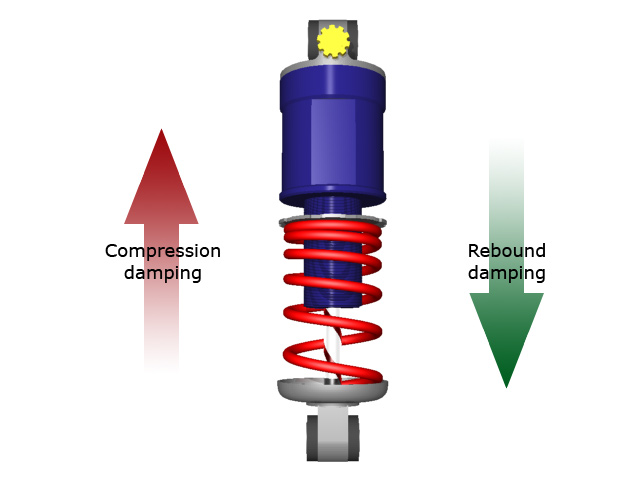
This is the damping that a shock absorber provides as it's being compressed, ie. as you hit a bump in the road. It's the resistance of the unit to alter from its steady state to its compressed state. Imagine you're riding along and you hit a bump. If there is too little compression damping, the wheel will not meet enough resistance as the suspension compresses. Not enough energy is dissipated by the time you reach the crest of the bump and because the wheel and other unsprung components have their own mass, the wheel will continue to move upwards. This unweights or unloads the tyre and in extreme cases, it can lose contact with the road. Either way, you briefly lose traction and control.
The opposite is true if compression damping is too heavy. As the wheel encounters the bump in the road, the resistance to moving is high and so at the crest of the bump, the remaining energy from the upward motion through the shock absorber is transferred into the frame of the bike or the chassis of the car, lifting it up.
Rebound damping.
Go on - have a guess at what this is. Well in case you're not following along, this is the damping that a shock absorber provides as it returns from its compressed state to its steady state, ie. after you've crested the bump in the road. Too light, and the feeling of control in your vehicle is minimised because the wheel will move very quickly. The feeling is the soft, plush ride you find in a lot of American cars. Or mushy as we like to call it. Too heavy, and the shock absorber can't return quickly enough. As the contour of the road drops away after the bump, the wheel has a hard time "catching up". This can result in reduced traction, and a downward shift in the height of the vehicle. If that happens, you can overload the tyre when the weight of the vehicle bottoms-out the suspension.
Damping controllers.
High-end kit has controls on the shock absorber for both compression and rebound damping. Typically the rebound damping will be a screwdriver slot at the top of the shock absorber, and compression damping will be a knob either on the side or on the remote reservoir. Ultra-high-end kit has separate controls for high- and low-speed damping. ie. you can make the shock absorber behave differently over small bumps (low speed compression and rebound) than it does over large bumps (high speed compression and rebound). Of course you could buy yourself a nice big TV, a DVD player, dark curtains, a new couch and a year's supply of popcorn for the same cost as four of these units.
Spring preload.
Some motorbike suspension units, as well as some found on cars, give you the ability to alter the spring preload or pre-tension. This means that you're artificially compressing the spring a little which will alter the vehicle's static sag - the amount of suspension travel the vehicle consumes all by itself. For example, if you ride a motorbike on your own, the preload might work on the factory setup. But if you put a passenger on the back, the tendency is for the bike to sag because there's now more sprung weight. Increasing the preload on the spring plate will help compensate for this.
Sprung vs. unsprung weight.
Simply put, sprung weight is everything from the springs up, and unsprung weight is everything from the springs down. Wheels, shock absorbers, springs, knuckle joints and tyres contribute to the unsprung weight. The car, engine, fluids, you, your passenger, the kids, the bags of candy and the portable Playstation all contribute to the sprung weight. Reducing unsprung weight is the key to increasing performance of the car. If you can make the wheels, tyres and swingarms lighter, then the suspension will spend more time compensating for bumps in the road, and less time compensating for the mass of the wheels etc.
The greater the unsprung weight, the greater the inertia of the suspension, which will be unable to respond as quickly to rapid changes in the road surface.
As an added benefit, putting lighter wheels on the car can increase your engine's apparent power. Why? Well the engine has to turn the gearbox and driveshafts, and at the end of that, the wheels and tyres. Heavier wheels and tyres require more torque to get turning, which saps engine power. Lighter wheels and tyres allow more of the engine's torque to go into getting you going than spinning the wheels. That's why sports cars have carbon fibre driveshafts and ultra light alloy wheels.
Progressively wound springs
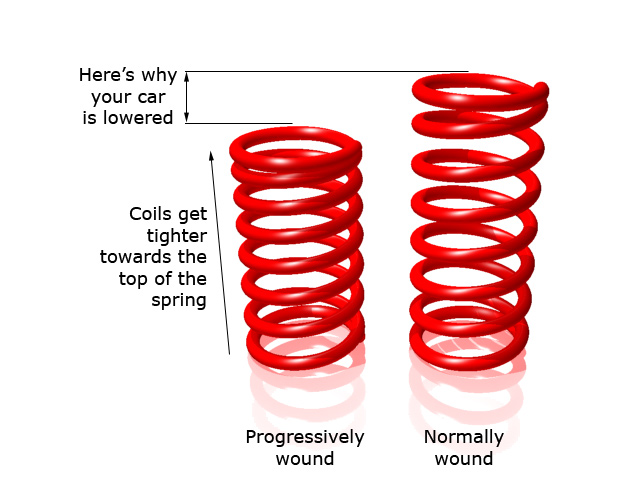
These are the things to go for when you upgrade your springs. In actual fact, it's difficult not to get progressive springs when you upgrade - most of the aftermarket manufacturers make them like this. Most factory-fit car springs are normally wound. That is to say that their coil pitch stays the same all the way up the spring. If you get progressively wound springs, the coil pitch gets tighter the closer to the top of the spring you get. This has the effect of giving the spring increasing resistance, the more it is compressed.
The spring constant (stiffness) of a coil spring equals:
k = compression / force = D^4 * G / (64*N*R^3)
where D is the wire diameter, G an elastic material property, N the number of coils in the spring, and R the radius of the spring.
So increasing the number of coils decreases the stiffness of the spring. Thus, a progressive spring is progressive because the two parts are compressed equally until the tightly wound part locks up, effectively shortening the spring and reducing its compliance.
So for normal driving, you'll be using mostly the upper 3 or 4 'tight' winds to soak up the average bumps and potholes. When you get into harder driving, like cornering at speed for example, because the springs are being compressed more, they resist more. The effect is to reduce the suspension travel at the top end resulting in less body roll, and better road-holding. Invariably, the fact that the springs are progressively wound is what accounts for the lowering factor. The springs aren't made shorter - they're just wound differently. Of course the material that aftermarket springs are made of is usually a higher grade than factory spec simply because it's going to be expected to handle more loads.
Note:Make sure you get powder-coated springs! This means they've been treated with a good anti-corrosion system and then covered in powdered paint. The whole lot is then baked to make the paint seal and stick and bring out it's polyurethane elastic properties. It's the best type. If you just get normally painted springs, the paint will start to flake on the first bump, and surface rust will appear within days of the first sign of dampness. Not good. Besides - powder coated springs look cool too! ![]()
Suspension calculations
I know a fair bit about suspension but when it comes to empirical calculations, not so much. Because I've been asked this question a great many times, I decided to provide a link to for those who are interested, to the Suspension Calculator project which aims at helping people that are building race cars perform suspension related calculations. The calculations vary from motion ratios, to spring stiffness, to wheel loads.
Electronic damping force controllers.
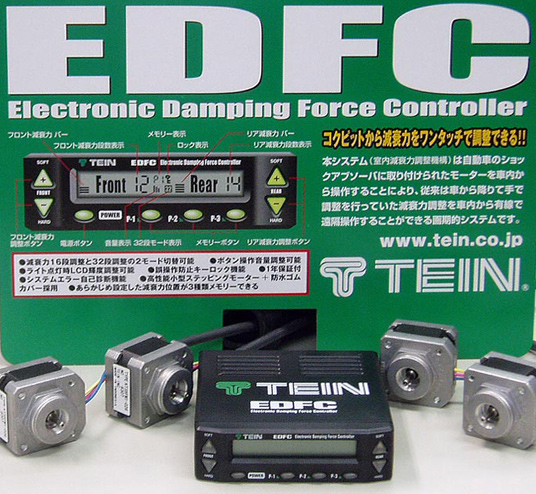
Remember way back at the top of the page I mentioned that some dampers allowed you to change the damping rate by altering the size of the constriction hole? That's all very well and good but you have to stop your car, get out and twiddle a knob or screw on the top or side of the strut each time you want to make a change. In 2005 the aftermarket saw the first appearance of an EDFC - electronic damping force controller.
The premise is really simple. Four servo motors (the four smaller boxes in the picture here), one for each strut, each one designed to replace the manual screw adjuster. A control unit mounts inside the car and allows you to change the damping force of the shocks front and rear without leaving the drivers seat. The way it works is dead simple. When you first install the system and power it up, all the servos spin clockwise for a few seconds. This ensures the adjusters are screwed all the way in on all four struts. From that point, you can dial in any number from 0 to 20 on the control unit. When you do, the servo motors spin a certain amount - the same as you getting out of the car and spinning the adjuster with your finely calibrated fingers. The units currently have three memory settings so you can store motorway, city and track-day settings (for example), and recall them at the push of a button.
Installing the current-generation EDFCs is pretty simple - about the most difficult thing you'll face is running the wires from each servo back to the control unit inside the car.
There's a few different companies selling EDFCs right now. This link will take you to a googlesearch for further info.
Picture credit: TEIN
Torsion bars
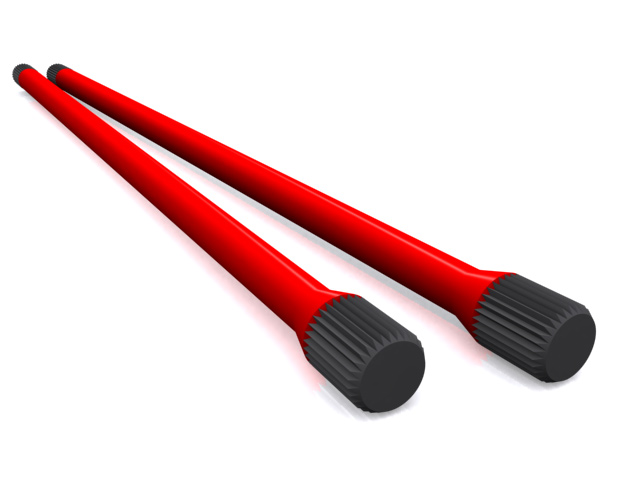
Torsion bars (or torsion rods) deserve their own section because they are a type of spring which can be used in place of coil- or leaf-springs. It's one of the topics I get the most e-mail on, so instead of continually sending the same answer, I thought I'd cover it on this page.
A torsion bar is a solid bar of steel which is connected to the car chassis at one end, and free to move at the other end. They can be mounted across the car (transverse like the rear suspension on the Peugeot 205 and Renault 16) or along the car (longitudinal, like the front suspension on the Morris Minor) - one for each side of the suspension. The springing motion is provided by the metal bar's resistance to twisting. To over-simplify, stick your arm out straight and get someone to twist your wrist. Presuming that your mate doesn't snap your wrist, at a certain point, resistance in your arm (and pain) will cause you to twist your wrist back the other way. That is the principle of a torsion bar.
Torsion bars are normally locked to the chassis and the suspension parts with splined ends. This allows them to be removed, twisted round a few splines and re-inserted, which can be used to raise or lower a car, or to compensate for the natural 'sag' of a suspension system over time. They can be connected to just about any type of suspension system listed on this page.
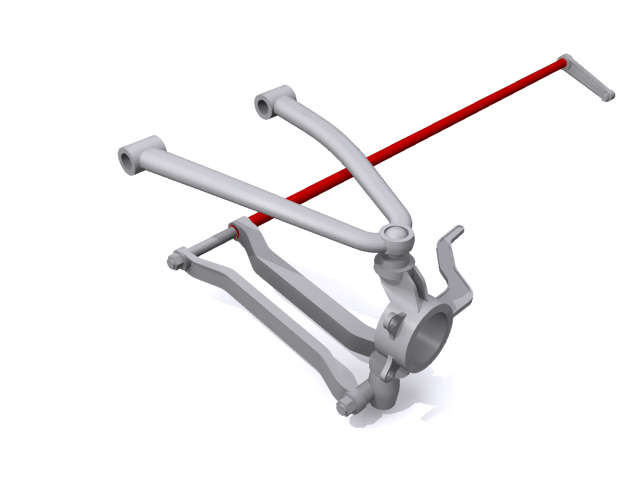
The rendering to the right shows an example longitudinal torsion bar. The small lever at the far end of the torsion bar would be attached solidly to the frame to provide the fixed end. The torsion bar itself fits into that lever and the suspension arm at the front through splined holes. As the suspension at the front moves upwards, the bar twists along its length providing the springing motion. I've left the shock absorber assembly out of this rendering for clarity.
Lift Kits
Because of the mechanical nature of suspension, all sorts of mods are available. Lifting suspension is a popular mod used to try to increase ground clearance. This is often a source of misunderstanding. A lift kit doesn't really give you more ground clearance. What it does is increase the height between the axle and the underside of the body. Whilst this does give more ground clearance for the bodywork, the lowest point on the vehicle is still the axles - or on a 4-wheel-drive, the bottom of the transfer case. For this reason, you'll often see trucks and SUVs with lift kits and larger wheels and tyres. The lift kit boosts the clearance under the bodywork whilst the larger wheels and tyres result in the axles being lifted higher off the ground. Technically of course, in a 4-wheel-drive, you don't really need a lift kit - bigger wheels and tyres would do it. BUT lift kits typically end up being required because adding on the larger wheels and tyres can often mean they will no longer fit in the wheel arches. The lift kit will help solve that problem.
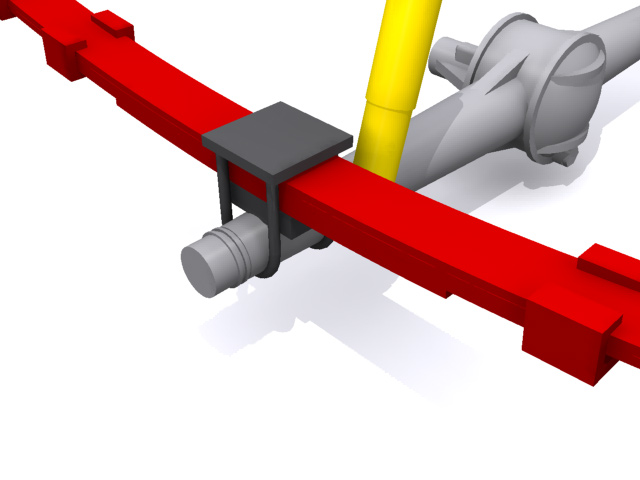
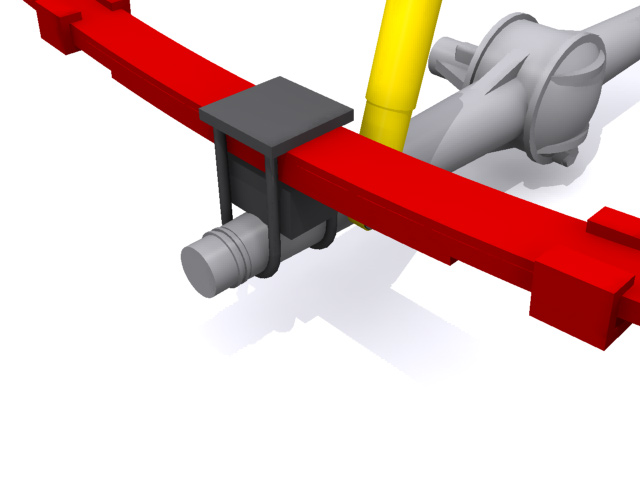
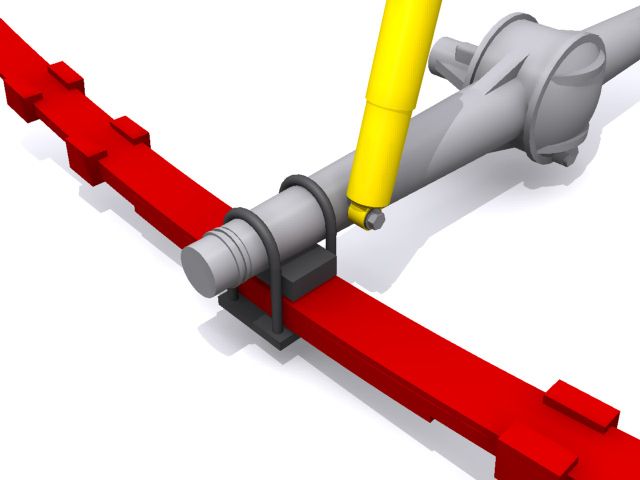
Lift kits come in literally hundreds of shapes and sizes, all dependent on the final application as well as the design of the vehicle the kit is going to be used on. For street cars, typically with independent suspension, the kit will basically be longer struts, longer springs and remounted shocks. For off-roaders with beam axles and transfer cases, the suspension system is typically leaf-spring, so the kit will be a set of blocks that fit between the beam axle and the bottom of the leaf spring. Alternatively, some kits have blocks which lower the spring mounts themselves so that the spring-to-axle joint isn't changed. The images here show examples of a typical leaf-spring beam-axle suspension system along with two examples of how it can be raised.
Fitting a lift kit is pretty basic engineering but it's really difficult to do without access to a hydraulic lift, so its best to either get a garage to do it, or to find a mechanic friend who has a decent sized hydraulic lift. Trying to mess with the suspension whilst a vehicle is on the ground is just asking for trouble.
Speaking of trouble...
Lifting a vehicle is going to affect its handling. Most obviously, you're going to add height to the centre of gravity, which in turn is going to make the vehicle more prone to roll in corners. At the extreme, an already roll-happy SUV or truck will become even more likely to turn over in the event of an accident.
Similarly, just because you've lifted your truck, don't think you can instantly go off-road with it like a pro. If you're doing it for off-road functionality rather than just pose value, spend the extra cash and get a one-day off-road course. You'll have a blast and it will make you infinitely safer when you do take your vehicle off the beaten track.
It's also worth pointing out that putting larger wheels on simply to increase ground clearance can come with all its own problems including the legality of it, changes to the steering and suspension geometry and steering load. It's also a possibility on some types of 4WD vehicle that larger tyres and steering load can result in tearing the steering box off the chassis. Other things which tend to fail quicker when this is done are items like pitman arms, track rods, knuckle and ball joints - all of these get stressed beyond their normal design limits when you stuff massive tyres and wheels on a truck.
One other point to consider when doing this: if your speedometer is based on a mechanical link to the gearbox, your speedo will become so innacurate that it will basically be useless. You'll be driving at an indicated 30mph but could be doing 40mph if the tyres are big enough.
Just be warned.
Lowering Kits
The opposite of lift kits - lowering kits. These are designed to (wait for it....) lower your car. Also at the other end of the scale - lowering kits are almost exclusively used on cars, whereas lift kits are almost exclusively used on trucks and SUVs. (Having said that, the number of pimped-out low-rider trucks on the road does seem to be increasing by the day.) Lowering your car will similarly affect the handling, just like a lift kit. But again it's the opposite end of the spectrum - a lowered car will typically handle much better than factory suspension, and it will lower the centre of gravity, making it less likely to tip or roll in an accident. I'm a European, and as far as I'm concerned, if you're going for pose value, lowering your car is the quickest way to do it, hotly pursued by larger wheels and tyres to make the car appear even more ground-hugging.
Lowering kits typically consist of shorter, stiffer springs and gas shocks - often nitrogen-filled. Don't do it by halves. Get a matched kit from someone like Spax or Jamex. Matched kits have springs and shocks designed to work together. If you get shorter springs, your factory shocks will be under a lot of stress because they'll be operating a much shorter throw than they were designed for, and ultimately, they'll normally fail much quicker. Similarly, don't get shorter shocks and cut the springs. Cutting the springs is the epitome of A Really Bad Idea. You're weakening the spring's structural integrity and the chances are that when you've finished a ham-fisted attempt at hacking off all 4 springs with a grinder, the result will be 4 springs all slightly different lengths.
There's something else worth mentioning here - do not try to disassemble a shock absorber. Ever. Those things are like little bombs, and unless you have all the right tools, you could easily loose a hand as the shock explodes into its component parts when you get that last twist off the collar. Please - just don't. I know your mate Guido might have told you it's a "sure fire" way to shorten the shock, but he's lying.
Matched lowering kits typically assume you're going for sportier handling, so a lot of times, you'll get a whole slew of new adjustments which you never had before. Spring height, rebound damping, compression damping etc. My recommendation is to leave everything as it is to start with. Right out of the box they're normally set up pretty well.
Lowering kit questions.
- What if I get shorter springs to lower the car? Will I need to adjust my caster and camber angles and/or my shock absorbers?
- Generally the answer would be yes. Once you start altering ride height, all the suspension components 'rest' in a different position. From the section on caster and camber in the tyre bible, you'll see that toe, caster and camber all change dynamically as the car rolls in corners or the suspension moves up and down in relation to the road. For example, lowering a car can result in the lower suspension control arms being angled upwards, when they used to be angled downwards. This changes the angle of the hub carrier relative to the road, creating positive camber. On double-wishbone type suspension, the combination of both control arms being angled upwards increases the camber gain even more with suspension movement, so that when cornering, the car rolls much more easily, going into far more positive camber, and creating a worse-handling car than with the original suspension setup. With McPherson suspension, the upper arm is basically infinite-length and perpendicular to the strut so the angle doesn't change that much when lowered.
The problem is that these geometry changes are hard to compensate for with alignment work. Typically to get it as close as possible to factory spec when static, you need adjustable control arms, ball joints etc. To get it back to spec under dynamic conditions, now you're talking about different wheel hub carriers (with lowering spindles) or different ball joints with longer studs in the lower control arms, and/or ball joints with longer housings if mounted in the hub carrier. Lowered suspension also exaggerates (or created) bump-steer - a situation where compressing the suspension can result in the unwanted steering input. To compensate for this, you need to consider new steering arms with relocated positions for the ball joints and tie rods. Sometimes this can be compensated for by winding the tie rods in more tightly to shorten them, but not always. So yes, if you lower your car, you must consider all the factors from realignment (for McPherson systems, to full replacement components on multi-link or dual wishbone types. As for the shocks, see the FAQ page. - What if I get shorter springs to lower the car? Will my tyres rub on my arches?
- They shouldn't unless you start messing about with wheel and tyre sizes. Again, given that most suspension kits lower within the car's normal operating limits, there shouldn't be a problem. If there was, then every time you went over a big hump with standard suspension, the tyres would rub. Rubbing against the arches will almost certainly only occur if you lower the car and widen the wheels. See the Wheel & Tyre Bible for more info on this.
Where can I buy a good kit to lower or lift my car?
Again, a lot of local and internet stores that offer you ready to go suspension kits. Spax and Jamex are two big names for car suspension kits.