The wheel and tyre Bible - everything you need to know about how to read your tyres (tires) and wheels with more info on rim sizes, tread depth and wear, aquaplaning, wheel balancing, aftermarket wheels, alloys, TPMS tire pressure monitoring systems and much more.
The Wheel & Tyre Bible
Wheel dimensions
Okay. If you want to change the wheels on your car, you need to take some things into consideration.
-
Number of bolts or studs
It goes without saying that you can't fit a 4-bolt wheel onto a 5-bolt wheel hub. Sounds obvious, but people have been known to fork out for an expensive set of alloy wheels only to find they've got the wrong number of mounting holes. -
Pitch Circle Diameter
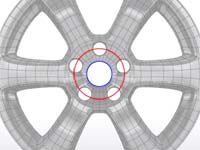
Right. So you know how many holes there are. Now you need to know the PCD, or Pitch Circle Diameter. This is the diameter of the invisible circle formed by scribing a circle that passes through the centre point of each mounting hole (red in the image here). If you've got the right number of holes, but they're the wrong spacing, again the wheel just won't fit.
-
PCD notation
Stud patterns and PCD values are typically listed in this notation : 5x114.42. This means a 5-bolt pattern on an imaginary circle of 114.42mm diameter. -
Centre spigot size
This is a tricky one. There are two types of axle/wheel design: hub-centric and lug-centric.
For hub-centric designs, the wheel is centred using the spigot before the wheel nuts or lug bolts are tightened. In this design the spigot normally sticks out from the axle of the car which is why it can be used to centre the wheel beforehand. With aftermarket alloy wheels, the spigot hole is often larger than the spigot on the car which is why you need a spigot-locating or hub-centric ring. This is a plastic or metal doughnut that matches the outside diameter of the wheel's spigot hole and the inside diameter of the axle spigot, and is used to ensure a snug fit between the two whilst centring the wheel.
For lug-centric designs, the wheel is centred during the process of tightening the lug nuts, often because the axle spigot does not stick out (either at all, or far enough) to be any use in centring the wheel.
-
Inset or outset
This is very important. Ignore this and you can end up with all manner of nasty problems. This is the distance in mm between the centre line of the wheel rim, and the line through the fixing face. You can have inset, outset or neither. This determines how the suspension and self-centring steering behave. The most obvious problem that will occur if you get it wrong is that the steering will either become so heavy that you can't turn the car, or so light that you need to spend all your time keeping the bugger in a straight line. More mundane problems through ignoring this measurement can range from wheels that foul parts of the bodywork or suspension, to high-speed judder in the steering because the suspension setup can't handle that particular type of wheel. This figure will be stamped on the wheel somewhere as an ET figure.
Inset and outset are subsets of offset and the relationship is this : positive offset = inset. Negative offset = outset. Typically you can get away with 5mm-7mm difference from the vehicle manufacturer specification before you'll run into trouble with the wheels fouling the suspension or bodywork. So for example if your stock wheels have an offset of 42mm and you can only find replacements with a 40mm offset, that 2mm difference ought to OK.
| No offset | Inset wheel | Outset wheel |
|---|---|---|
![[none]](images/no_offset.gif) |
![[inset]](images/inset_wheel.gif) |
![[outset]](images/outset_wheel.gif) |

-
More inset = closer to the suspension?
It may sound counterintuitive, but when you increase the inset of a wheel, you decrease the clearance between the inner edge of the wheel and the suspension components. In the example here, the red wheel has a larger inset - ie. the distance from the mounting face to the centreline of the wheel is larger than that of the green wheel. The grey blocks indicate a stylised mounting hub, axle and suspension component. You can see that by increasing the inset (positive offset) of the wheel, it pushes the inner edge of the wheel and tyre closer to the suspension. Conversely, decreasing the inset moves the wheel and tyre closer to the outside of the vehicle where it might scrub and rub against the bodywork and wheel arches. It might help to think of this more in terms of overall offset rather than inset and outset. The most positive the offset, the more the wheel is tucked into the car. The more negative the offset, the more the wheel sticks out.
![[arealwheel]](images/arealwheel.jpg)
-
A real example
They say a picture is equivalent to a thousand words, so study this one carefully. It's one of the alloy wheels off one of my old cars. Enlarged so you can read it is the wheel information described above. You'll notice it reads "6J x 14 H2 ET45". The "6J x 14" part of that is the size of the wheel rim - in this case it has a depth of 6 inches and a diameter of 14 inches (see the section directly below here on wheel sizes for a more in-depth explanation). The "J" symbolises the shape of the tyre bead profile. (see rim contours below)
The "H2" means that this wheel rim is a double hump design (see hump profiles, below). The "ET45" figure below that though symbolises that these wheels have a positive offset of 45mm. In other words, they have an inset of 45mm. In my case, the info is all stamped on the outside face of the wheel which made it nice and easy to photograph and explain for you. On most aftermarket wheels, they don't want to pollute the lines and style of the outside of the wheel with stamped-on information - it's more likely to be found inside the rim, or on one of the inner mounting surfaces.
Trivia note: ET comes from "Einpresstiefe" in German - rim offset (actually "inset", literally).
The wheel offset calculator
This little javascript will help you to understand the different between your old and new wheel and tyre combination in terms of the offset and how it's going to affect the overall lateral position of the wheel and tyre. Technically you can do this calculation with either the wheel width in inches or the tyre section in mm. I chose to use the tyre section instead of the wheel width because in almost every case, the tyre extends beyond the wheel rim so it's the widest part of the wheel and tyre combo. So whilst calculating the clearance just with the wheel might show no interference between the suspension or bodywork and the wheel, once a tyre is added, it could interfere as the tyre is wider.
Matching your tyres to your wheels
Okay. This is a biggie so take a break, get a hot cup of Java, relax and then when you think you're ready to handle the complexities of tyre matching, carry on. This diagram should help you to figure out what's going on.
![[xsection]](images/xsection.gif)
Wheel sizes
Wheel sizes are expressed as WWWxDDD sizes. For example 7x14. A 7x14 wheel is has a rim width of 7 inches, and a rim diameter of 14 inches. The width is usually below the width of the tyre for a good match. So a 185mm tyre would usually be matched to a wheel which is 6 inches wide. (185mm is more like 7 inches, but that's across the entire tyre width, not the bead area where the tyre fits the rim.)
Static loaded radius, outer diameter and rolling circumference
![[rolling circumference]](images/rollingcircumference.gif)
These three measurements are all important to consider when talking about wheels and tyres. They're all interlinked. Straight from the manufacturer, a tyre is circular and it's outer diameter (OD) is based on this unladen, perfectly circular condition. Because tyres deform under load (flatter on the bottom than they are on the top when taking the weight of a car), the vertical radius of a tyre under load is not half the diameter. It's typically about 44% of it (from the centre of the wheel to the road). In addition, a tyre doesn't roll like a solid wheel; the steel or fabric belt 'rolls along the ground' like a caterpillar tank tread does. Because of this, the rolling circumference of the tyre isn't quite what you'd expect. The closest approximation for this value can be calculated by taking the outer diameter, subtracting twice the tread depth and multiplying by PI. Roughly speaking, that's 0.96 x OD x PI.
Now why is this magical value so important? If the rolling circumference changes because you've mismatched your new wheels and tyres, then your speedo will lose accuracy and the fuel consumption might go up. The latter reason is because the manufacturer built the engine/gearbox combo for a specific rolling circumference. Mess with this and the whole thing could start to fall down around you.
J, JJ, K, JK, B, P and D : Tyre bead profiles / rim contour designations.
![[beadprofile]](images/beadprofile.gif)
No, my keyboard letters weren't stuck down when I typed this. The letter that typically sits between the rim width and diameter figures stamped on the wheel, and indicates the physical shape of the wheel where the tyre bead meets it. In the cross-section on the left you can see the area highlighted in red.
Like so many topics, the answer as to which letter represents which profile is a long and complicated one. Common wisdom has it that the letter represents the shape. ie. "J" means the bead profile is the shape of the letter "J". Not so, although "J" is the most common profile identifier. 4x4 vehicles often have "JJ" wheels. Jaguar vehicles (especially older ones) have "K" profile wheels. Some of the very old VW Beetles had "P" and "B" profile wheels.
Anyway the reason it is an "awkward topic to find definitive data on" is very apparent if you've ever looked at Standards Manual of the European Tyre and Rim Technical Organisation. It is extremely hard to follow! There are pages and pages (64 in total) on wheel contours and bead profiles alone, including dimensions for every type of wheel you can think of (and many you can't) with at least a dozen tabled dimensions for each. Casually looking through the manual is enough to send you to sleep. Looking at it with some concentration is enough to make your brain run out of your ears. To try to boil it all down for you, it seems that they divide up the rim into different sections and have various codes to describe the geometry of each area. For example, the "J" code makes up the "Rim Contour" and specifies rim contour dimensions in a single category of rims called "Code 10 to 26 on 5deg. Drop-Centre Rims". To give you some idea of just how complex / anal this process is, I've recreated one such diagram with Photoshop here to try to put you off the scent.
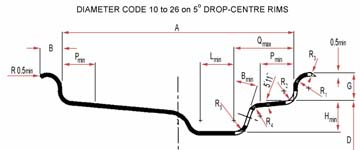
From the tables present in this manual, the difference in dimensions between "J" and "B" rims is mainly due to the shape of the rim flange.
This is the part in the diagram defined by the R radius and B and Pmin parameters. Hence my somewhat simpler description : tyre bead profiles.
Note that in my example, the difference between "J" and "B" rims is small but not negligible. This area of rim-to-tyre interface is very critical. Very small changes in a tyre's bead profile make large differences in mounting pressures and rim slip.
"A" and "D" contour designations come under the category of "Cycles, Motorcycles, and Scooters" but also show up in the "Industrial Vehicles and Lift Trucks" category. Naturally, the contours have completely different geometry for the same designation in two different categories.
The "S", "T", "V" and "W" contour designation codes fall into the "Commercial Vehicles, Flat Base Rims" category. The "E", "F", "G" and "H" codes fall into the "Commercial Vehicles, Semi-Drop Centre Rims" category. Are you beginning to see just how complex this all is?
I think the best thing for you, dear reader, is a general rule-of-thumb, and it is this : if your wheels are stamped 5J15 and you buy 5K15 tyres, rest assured they absolutely won't fit.
H, H2, FH, CH, EH and EH2 : Hump profiles.
More alphabet soup. So you might have just about understood the bit about bead profiles, but there's another design feature of wheel rims. The 'hump' is actually a bump put on the bead seat (for the bead) to prevent the tyre from sliding off the rim while the vehicle is moving. As with rim contours, there are several different designations of hump design and configuration, depending on the number and shape of the humps. For the inquisitive reader, here's a table of the hump designations, and a diagram similar to the one above which displays in nauseating detail just what a hump really is. The eagle-eyed amongst you (or those paying attention) will notice that this diagram is an enlarged view of the area around Pmin in the other ETRTO diagram above, because that's typically where the hump is.
| Designation | Bead Seat Contour | Marking | |
|---|---|---|---|
| Outside | Inside | ||
| Hump | Hump | Normal | H |
| Double Hump | Hump | Hump | H2 |
| Flat Hump | Flat Hump | Normal | FH |
| Double Flat Hump | Flat Hump | Flat Hump | FH2 |
| Combination Hump | Flat Hump | Hump | CH |
| Extended Hump | Extended Hump | Extended Hump | EH2 |
| Extended Hump 2+ | Extended Hump 2+ | Extended Hump 2+ | EH2 + |
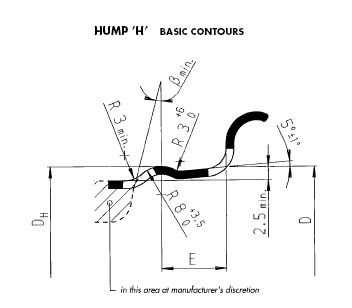
If you're obsessive-compulsive and absolutely must know everything there is to know about bead profiles, humps and rim flanges, you can check out the ETRTO (European Tyre and Rim Technical Organisation website from where you can purchase their manuals and documents. Go nuts. Meanwhile, the rest of us will move on to the next topic.
Like the site? The page you're reading is free, but if you like what you see and feel you've learned something, a small donation to help pay down my car loan would be appreciated. Thank you.
Why would I want to change wheels and tyres anyway?
A good question. Styling and performance are the only two reasons. Most cars come with horrible narrow little tyres and 13 inch rims. More recently the manufacturers have come to their senses and started putting decent combinations on factory cars so that's not so much of a problem any more. The first reason is performance. Speed in corners more specifically. If you have larger rims, you get smaller sidewalls on the tyres. And if you have smaller sidewalls, the tyre deforms less under the immense sideways forces involved in cornering.
So how does it all figure out?
Point to note: 1 inch = 25.4mm. You need to know that because tyre/wheel manufacturers insist on mixing mm and inches in their ratings.
Lets take an average example: a car with factory fitted 6x14 wheels and 185/65 R14's on them.
- Diameter of wheel in mm = 14*25.4 = 355.6mm
- Section height = 65% of 185mm = 120.25mm
- Outer diameter of the unladen tyre = (wheel diameter) + 2(section height) = 355.6mm + 2x120.25mm = 596.1mm
- Approximate rolling circumference (remember - not static loaded radius - see rolling circumference above) is 0.96 x OD x PI = 0.96 x 596.1mm x PI = 1797.79mm
In other words, for one rotation of the wheel, the car will travel about 1798mm along the ground - about 1.8m. With me so far?
Good. Now lets assume I want some 7x15 rims which are slightly wider. A good tyre size for those would be 205/50 R15. (see the section below on aspect ratio to understand why). Do the same calculation again:
- Diameter of wheel in mm = 15*25.4 = 381mm
- Section height = 50% of 205mm = 102.5mm
- Outer diameter of the unladen tyre = (wheel diameter) + 2(section height) = 381mm + 2x102.5mm = 586mm
- Approximate rolling circumference is 0.96 x OD x PI = 0.96 x 586mm x PI = 1767.33mm
Look at the difference from the original tyre and wheel combo to the new one. 1797.79mm versus 1767.33mm. The new combo gives a rolling circumference that is 1.69% less than the original. In the world of wheels and tyres, that's good. You should aim to be within 3% when changing wheels and tyres.
A tyre size calculator.
Well if all that maths seems a little beyond you, and judging by the volume of e-mails I get on this subject, it might well be, I've made a little Javascript application below to help you out. Select the tyre size you currently have, and then the size you're interested in. Calculate each tyre size and then click on the click to calculate the difference button. It will show you all the rolling circumferences (ie. including the 96% calculation from static laden radius above), percentage differences and even speedometer error. Enjoy.
A Speedometer error means an odometer error too.
It stands to reason that if you change the rolling circumference of your wheels and tyres, and the speedometer no longer reads correctly, that your odometer will also gradually become inaccurate. Assume for example that you bought a car brand new and changed the wheels and tyres on day one from 185.65R14 to 205/50R15 - not an uncommon change. By the calculator above, that makes your speedometer over read by 1.7%. Consequently, the registered odometer reading will also be out by the same value. So for example, when you get to 10,000km of driving (in the real world), your odometer will actually read 10,170km. OK so that's not a huge difference but it is one of the reasons why most car dealers have a disclaimer on their secondhand vehicles telling you that they won't guarantee the displayed mileage. ("Clocking" the odometer is the other reason). Odometer errors due to mis-matched tyres and wheels will happen on regular odometers as well as the newer digital ones.
A quick word about motorcycle speedometers.
Veering off-topic for a moment, it's worth pointing out that without exception, all motorbike speedometers are designed to inflate the ego of the rider by at least 5%. In some cases, they are are much as 10% optimistic. ie. the speedometer on a motorbike will always over-read. 100mph? Not likely - you're actually doing closer to 90mph.
Aspect Ratio and Rim / Pan Width.
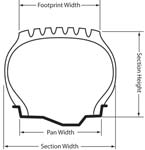
Aspect ratio is, as you know if you read the bit above, the ratio of the tyre's section height to its section width. The aspect ratio is sometimes referred to as the tyre 'series'. So a 50-series tyre means one with an aspect ratio of 50%. The maths is pretty simple and the resulting figure is stamped on all tyres as part of the sizing information:
Aspect ratio = (section height) / (section width)
The actual dimensions of a tyre depend on the rim on which it is mounted. The biggest variable is the tyre's section width; a change of about 0.2" for every 0.5" change in rim width.
The ratio between the section width and the rim width is pretty important. If the rim width is too narrow, you pinch the tyre in and cause it to balloon more in cross-section. If the rim width is too wide, you run the risk of the tyre ripping away at high speed.
For 50-series tyres and above, the rim width is 70% of the tyre's section width, rounded off to the nearest 0.5.
For example, a 255/50R16 tyre, has a design section width of 10.04" (255mm = 10.04 inches). 70% of 10.04" is 7.028", which rounded to the nearest half inch, is 7". Ideally then, a 255/50R16 tyres should be mounted on a 7x16 rim.
For 45-series tyres and below, the rim width is 85% of the tyre's section width, rounded off to the nearest 0.5.
For example, a 255/45R17 tyre, still has a design section width of 10.04" (255mm = 10.04 inches). But 85% of 10.04" is 8.534", which rounded to the nearest half inch, is 8.5". Ideally then, a 255/45R17 tyre should be mounted on an 8½x17 rim.
Sources: ETRTO Design manual. Yokohama Tyres
An ideal rim-width calculator
Blimey I'm good to you. Can't figure that maths out either? Click away my friend and Chris's Rimwidthulatortm will tell you what you need to know. Obvious disclaimer : the results should be verified with the tyre dealership/manufacturer.
Too wide or too narrow - does it make a difference?
Given all the information above, you ought to know one last thing.
A rim that is too narrow in relation to the tyre width will allow the tyre to distort excessively sideways under fast cornering. On the other hand, unduly wide rims on an ordinary car tend to give rather a harsh ride because the sidewalls have not got enough curvature to make them flex over bumps and potholes. That's why there is a range of rim sizes for each tyre size in my Rimwidthulator above. Put a 185/65R14 tyre on a rim narrower than 5inches or wider than 6.5inches and suffer the consequences.
The Plus One concept
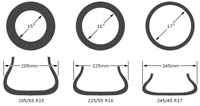
The plus one concept describes the proper sizing up of a wheel and tyre combo without all that spiel I've gone through above. Basically, each time you add 1 inch to the wheel diameter, add 20mm to the tyre width and subtract 10% from the aspect ratio. This compensates nicely for the increases in rim width that generally accompany increases in diameter too. By using a larger diameter wheel with a lower profile tyre it's possible to properly maintain the overall rolling circumference, keeping odometer and speedometer changes negligible. By using a tyre with a shorter sidewall, you gain quickness in steering response and better lateral stability. The visual appeal is obvious, most wheels look better than the sidewall of the tyre, so the more wheel and less sidewall there is, the better it looks.
Tyre size table up to 17" wheels
Here, for those of you who can't or won't calculate your tyre size, is a table of equivalent tyres. These all give rolling circumferences within a few mm of each other and would mostly be acceptable, depending on the wheel rim size you're after.
| 80 SERIES | 75 SERIES | 70 SERIES | 65 SERIES | 60 SERIES | 55 SERIES | 50 SERIES |
|---|---|---|---|---|---|---|
| 135/80 R 13 | - | 145/70 R 13 | - | 175/60 R 13 | - | - |
| - | - | 155/70 R 13 | 165/65 R 13 | - | - | - |
| - | - | - | 175/65 R 13 | - | - | - |
| 145/80 R 13 | - | 155/70 R 13 | 175/65 R 13 | 185/60 R 13 | 185/55 R 14 | - |
| - | - | 165/70 R 13 | 165/65 R 14 | 175/60 R 14 | - | - |
| - | - | 175/70 R 13 | - | - | - | - |
| 155/80 R 13 | 165/75 R 13 | 175/70 R 13 | 165/65 R 14 | 175/60 R 14 | 195/55 R 14 | 195/50 R 15 |
| - | - | 185/70 R 13 | 175/65 R 14 | 185/60 R 14 | 185/55 R 15 | - |
| - | - | 165/70 R 14 | - | 195/60 R 14 | - | - |
| 165/80 R 13 | - | 185/70 R 13 | 175/65 R 14 | 195/60 R 14 | 205/55 R 14 | 205/50 R 15 |
| - | - | 165/70 R 13 | 185/65 R 14 | 205/60 R 14 | 185/55 R 15 | 195/50 R 16 |
| - | - | 175/70 R14 | - | - | 195/55 R 15 | - |
| - | - | - | - | - | 205/55 R15 | - |
| 175/80 R 13 | 175/75 R 14 | 175/70 R 14 | 185/65 R 14 | 205/60 R 14 | 195/55 R 15 | 215/50 R 16 |
| - | - | 185/70 R 14 | 195/65 R 14 | 215/60 R 14 | 205/55 R 15 | 195/50 R 16 |
| - | - | - | 185/65 R 15 | 195/60 R 15 | - | 205/50 R 16 |
| 185/80 R 13 | 185/75 R 14 | 185/70 R 14 | 195/65 R 14 | 215/60 R 14 | 205/55 R 16 | 205/50 R 16 |
| - | - | 195/70 R 14 | 185/65 R 15 | 225/60 R 14 | - | 225/50 R 16 |
| - | - | - | 195/65 R 15 | 195/60 R 15 | - | 205/50 R 17 |
| - | - | - | - | 205/60 R 15 | - | - |
| - | - | - | - | 215/60 R 15 | - | - |
So that's it then?
Yes - that's it. A little time with a calculator, a pen and some paper will enable to you confidently stride into your local tyre/wheel supplier and state exactly what you want.
A Case study to help you out
Lead by example - that's a good motto. My Case Study will walk you through the entire process of selecting a new set of wheels and tyres so you can get an idea of what is involved.
Oversizing tyres
If you want the fat look but don't want to go bonkers with new wheels, you can oversize the tyres on the rims usually by about 20mm (to be safe). So if your standard tyres are 185/60 R14s, you can oversize them to about 205mm. But make sure you recalculate the percentage value to keep the sidewall height the same.
Fitment guides
 Rochford Tyres has an excellent fitment guide page where they list a ton of combinations and permutations of wheels and tyres for all the popular makes and models. The guide is designed to give you an idea of wheel and tyre sizes that will keep you close to spec for rolling circumference. Use the 'Alloy Wheel Search' box at the top-left of their site. As an added bonus, if you decide to buy anything from them, use the
  at the checkout to get 5% off! Sweet!
And finally, you might like to check out this little program written by Brian Cassidy,which helps with tyre size calculation.
