
The car Bibles product reviews: ScanGauge II Automotive Computer.
Product Reviews
Linear Logic ScanGauge II
Tested December 2008 
Website: www.scangauge.com
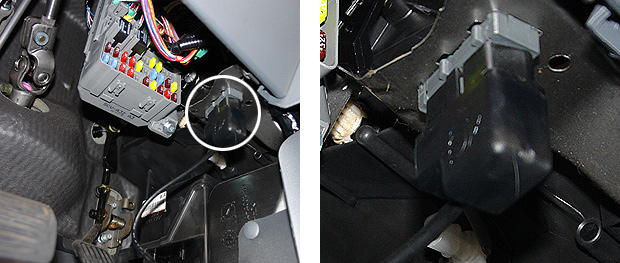
The ScanGauge II is an add-on multifunction computer that can be used in any car built after 1996. It has three main functions - an OBD II scanner, realtime gauges, and a trip computer. The ScanGauge II plugs in to your car's OBD (On Board Diagnostics) II port - hence why it can only be used on post 1996 vehicles, as those are the only ones that have them. On most cars, this is somewhere under the dash, near the steering column or the driver's knees. Mouseover the image on the right to see the location on the Honda Element I used for the test.
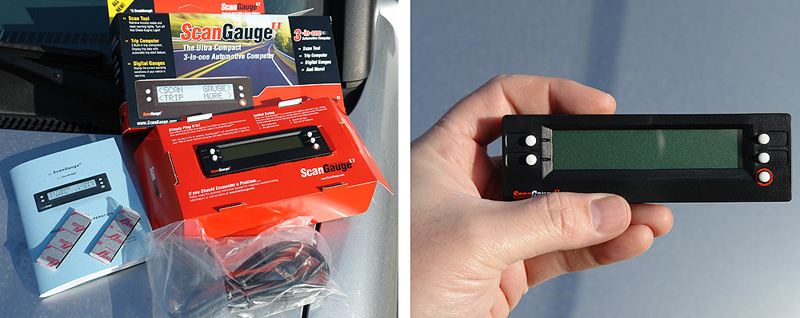
The ScanGauge comes nicely presented in a box with a flip-open front, displaying the device itself. It's quite tidy in size and has five buttons and an LCD display on the front and two RJ-45 style jacks - one on the side and one on the back so you get some choice of cable location. It comes with a connector cable, a small handbook and two pieces of self-adhesive velcro for mounting somewhere around the dash of your car. Once plugged in, it gets all the power from the +12v feed in the OBD II port so there is no need for a separate external power cord, which is nice - a single-cable design is much better than having multiple cables to try to hide away.
When first plugged in, the ScanGauge II takes a moment to connect to your car's computer, during which time it displays a Connecting... message. Once connected, it defaults to the home screen, which you can return to at any point be pressing the red-ringed button on the front.
The manual is a little small both in dimensions and print size, but once you've spent 5 minutes with the ScanGauge II, the manual will become more of a reference guide than a need-to-have document. This is because the device itself has a nicely thought out and very simple user interface. Each screen presents 4 options relating to the 4 buttons around the screen. Press the button next to the option you want and it does what you'd expect. For example, go to More->Setup and it takes you to the setup screen. When setting the engine size, the top buttons act as + and - for engine size whilst the bottom buttons are 'save' and 'cancel'.
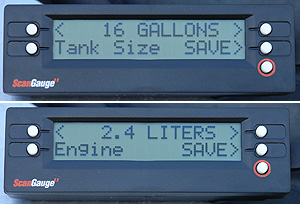
Setup and options. The first thing you need to do is to decide what units of measure you want - gallons (US or imperial) or litres and miles or kilometres. Once you've sorted that out, you need to tell it the size of your vehicle's engine and fuel tank capacity. This helps make the readings more accurate for engine-related measurements, and the fuel tank size is a requirement if you want the trip computer to work. In addition you also need to tell it whether you're using regular petrol or diesel or if you're driving an LPG or hybrid vehicle. Finally you can choose one of the eight pre-programmed screen background colours, or create your own so that it perfectly matches the existing dials in your car. All these settings are stored in NVM (non-volatile memory) meaning you can turn the unit on and off and not have to reset the values each time. There are a gajillion options in this thing that you can fine tune to your heart's content. Some are useful only to the über-geek, whilst others will be used by everyone. If you need to, you can fine-tune the device's readings by a certain percentage to account for speedometer inaccuracies or changes to standard vehicle equipment. For example if you have a wheel and tyre combination on your car which makes the speedometer under-read by 5%, you can enter -5% into the scangauge so it can compensate accordingly. I thought this was a nice option because it massively widens the number of people for whom this device could be useful, by opening up the aftermarket tuning scene as well as stock vehicles.
So how does it work? By being attached to your OBD II port, the scangauge can read a constant flow of data which is available to the engine management system, and present it to you on the screen. The list of standard items it can display is very comprehensive, and includes gas mileage, speed, engine rpm, throttle position, closed/open loop emissions control, voltage, air intake temperature, coolant temperature, engine load, intake manifold pressure to name just a few. Each item can be displayed in metric or imperial (depending on how you set it up initially) and in addition to the stock items, it has the ability to be programmed to pull other information off the OBD II port, operating in a mode called X-Gauge. This is a bit more geeky - you need to know four values - the TXD, RXD, RXF and MATH codes for a particular item. If you have that information to hand, you can tell the ScanGauge to submit that query code to the OBD II system and then listen for a response. For example, by default it does not show instantaneuous horsepower. Programming the correct codes in to one of the 24 programmable X-Gauge readings will return horsepower to that value and allow you to display it on-screen as a selectable gauge. Clever. Better still, Linear Logic maintain a constantly updated list of XGauge commands that you can refer to if you decide to get into adding new readouts.
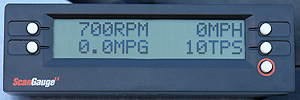
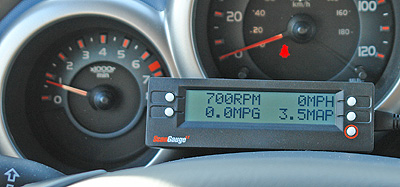
Gauge mode. In Gauge mode, the ScanGauge II shows four user-definable values on the screen at once. Pressing the button next to any of these items cycles them through the available items to view. If you select one and it doesn't give a reading (for example you just see 'VLT' instead of +12.6v) then it means the selection is not something your particular vehicle is transmitting on the OBD II port. The refresh rate for these values can be set in the setup menus, from normal to slow to fast. The correlation between the ScanGauge and the Honda for both speedometer and tachometer proved to be bang on. The photo below shows the rpm reading at idle with the device held in front of the car's own tachometer.
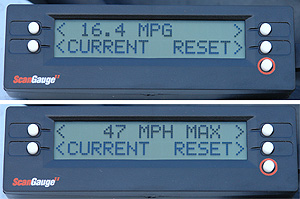
Trip computer.The trip computer mode is an interesting addition with this device especially for those of us who don't have rocket-science on-board computers in our cars (ie. normal cars, not roadgoing luxury yachts). Whilst it can't be 100% accurate because it has no direct knowledge of your fuel load, it's pretty damned close. Basically, each time you fill up, you go through one level of setup menu to the Fill Up option. The ScanGauge then assumes you have a tank containing the amount of fuel you indicated during initial setup - in my case 16 gallons. Because it can read gas-mileage and speed from the OBD II port, and because it has an internal clock, the device can then determine your estimated range-to-empty, the cost per mile and a whole host of other trip computer functions. As well as instantaneous readouts, it can show you overall averages, moving averages, and previous day or trip averages too. Whilst none of this will be news to anyone who's driving around in the aforementioned luxury yachts, the ScanGauge II does give the rest of us a lot more functionality than we have in our standard vehicles.
So can you rely on it? Well yes and no. Like I said, it has no direct knowledge of the fuel level in your car so it needs to assume you've entered the correct tank size, and filled it to the top. Part fills and incorrect tank sizes will skew the readings and make it inaccurate, so the human condition is the key variable here; the computer is only as good as the information you give it. Having said that, for the one tank I ran through during the test, it calculated my range-to-empty to within 5 miles of what I had estimated by hand. The average gas mileage was correct to within 5% of what I'd calculated too.
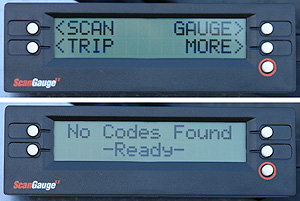
Scan mode. Scan mode is handy for some self-diagnosis of your vehicle. Most usefully, it will show you the 5-character error code(s) associated with a check engine light. From there it's up to you to sleuth out on the internet forums what a particular code means in relation to your exact vehicle.
It can pull these codes out of the OBD II system one at a time, and then if you choose, clear them. Clearing these codes in most cases causes the check engine light to turn off, but be aware that if you clear out non-trivial stuff, then any place you take the car for service isn't going to be able to see the history of stored codes. So this is a double-edged sword. For example if you're seeing a code for a faulty reading on an engine knock sensor and you clear it, whilst you know that error code existed, the next time your vehicle is serviced, the garage won't pick up on it (unless it happens again after you've reset the history). From that point of view, it's nice to be able to turn off the check engine light, but at the same time, if you don't know what you're doing it could lead to trouble.
Having said that, this can also be useful for determining whether there is any issue with your engine that is likely to flag an expensive repair next time around. A lot of the time, the diagnostic system will store away relatively trivial codes that do not cause a check engine light, but that will alert a technician next time they plug your car in during a service. For example a history of intermittent coolant overheating codes could point to a thermostat on the way out.
The test. I spent a weekend with the ScanGauge II mounted in the Honda Element, driving around town and up and down the mountains. Even in direct sunlight the display was nice and clear to read, and the sensitivity of the buttons was excellent - the lightest touch and they register an input. At night the display colour was easy to tune to the colour of the rest of my instruments although this is one item that seems missing : auto-dimming. The setup options allow you to tune the brightness of the backlight - dim, bright and off - but that setting is buried two menus deep. At night I found the bright backlight to be too bright - the dim worked better but I needed to pull over to fiddle with it and change the setting. I can imagine a fair number of drivers trying to make that sort of adjustment on the move and losing their concentration on the road. More useful would be a simple light sensor that could measure the ambient light near the gauge and adjust the backlight from bright or off (in the daytime) to dim at night if the driver wanted it to. It was a minor annoyance but one which would be nice to see on Linear Logic's wishlist of items for their next version.
As far as the scanner functionality goes, I managed to induce a P0440 error code for the emission control system by driving with the gas cap removed. This eventually caused the check engine light to come on as well (on my car) as a message that informed me to "check gas cap". When I scanned the OBD II with the ScanGauge, sure enough, there was the P0440 code. It was easy to clear and as I did so, the check engine light on my dash went off. Short of snipping the wiring to some other crucial part of the engine, I can't tell you how it would work with other error codes, but I've no reason to believe it would be any different.
Conclusion : geeky - yes. Useful - definitely.
Fitting the ScanGauge II to your car should be simplicity itself. A lot of people will make do with the self-adhesive velcro, but the more serious enthusiast will be able to mount it permanently. Having the two choices of cable position is a great idea, and the ScanGauge powers itself on and off automatically from the OBD port 12v power supply. Once it's mounted, you could find yourself altering how you drive, especially if you have the gauge mode showing you intake manifold pressure, engine load and gas mileage. This device will educate you extremely quickly as to why your vehicle gives you the gas mileage it does. You can find yourself trying different things to get that gas mileage figure up higher, and even if you're not particularly car-savvy, it will help to show you exactly how your right foot affects everything in the engine. Interestingly, having the throttle position sensor displayed will give you some clue as to how your cruise control works if you have one. You might not think it's doing much but that value will fluctuate constantly as the cruise system maintains your chosen speed.
The trip computer mode is very useful for people who don't have a trip computer in their vehicle already, and the scan mode is a good one for the home mechanic who likes to know a little more about the internal workings of their engine and the fault code reporting system. More often than not though, I suspect you'll end up driving around looking at gas mileage, speed, engine load and throttle position. And if that saves you some cash when it comes to gas mileage, that's always A Good Thing. My one recommendation : don't program in the XGauge for brake horsepower - you'll be sorely tempted to flog your car to within an inch of it's life to see how big a number you can get. And if the police see you doing it, that'll either be "street racing" or "excessive demonstration of speed" that will appear on your police record.