The car Bibles product review page: Electronics, gadgets and gizmos.
![[product reviews]](images/productreviews.gif)
Linear Logic ScanGauge II
Tested December 2008 
Website: www.scangauge.com
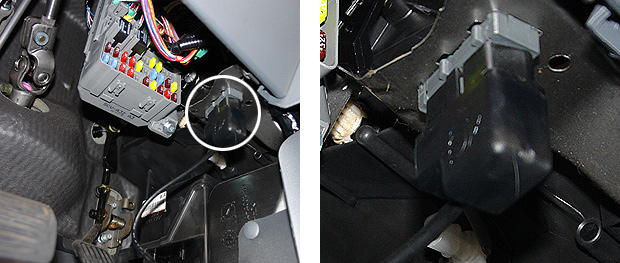 The ScanGauge II is an add-on multifunction computer that can be used in any car built after 1996. It has three main functions - an OBD II scanner, realtime gauges, and a trip computer. The ScanGauge II plugs in to your car's OBD (On Board Diagnostics) II port - hence why it can only be used on post 1996 vehicles, as those are the only ones that have them. On most cars, this is somewhere under the dash, near the steering column or the driver's knees. Mouseover the image on the right to see the location on the Honda Element I used for the test.
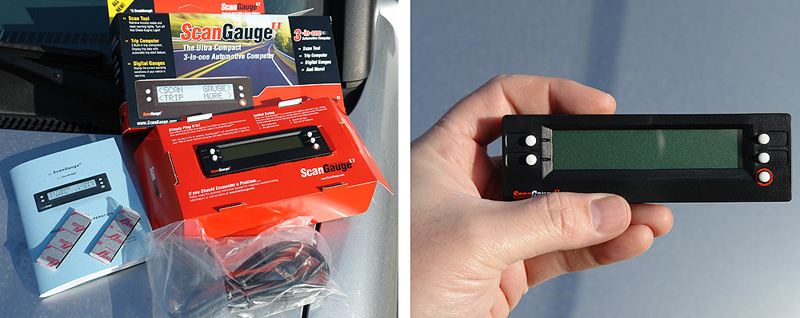
The ScanGauge comes nicely presented in a box with a flip-open front, displaying the device itself. It's quite tidy in size and has five buttons and an LCD display on the front and two RJ-45 style jacks - one on the side and one on the back so you get some choice of cable location. It comes with a connector cable, a small handbook and two pieces of self-adhesive velcro for mounting somewhere around the dash of your car. Once plugged in, it gets all the power from the +12v feed in the OBD II port so there is no need for a separate external power cord, which is nice - a single-cable design is much better than having multiple cables to try to hide away.
When first plugged in, the ScanGauge II takes a moment to connect to your car's computer, during which time it displays a Connecting... message. Once connected, it defaults to the home screen, which you can return to at any point be pressing the red-ringed button on the front.
The manual is a little small both in dimensions and print size, but once you've spent 5 minutes with the ScanGauge II, the manual will become more of a reference guide than a need-to-have document. This is because the device itself has a nicely thought out and very simple user interface. Each screen presents 4 options relating to the 4 buttons around the screen. Press the button next to the option you want and it does what you'd expect. For example, go to More->Setup and it takes you to the setup screen. When setting the engine size, the top buttons act as + and - for engine size whilst the bottom buttons are 'save' and 'cancel'.
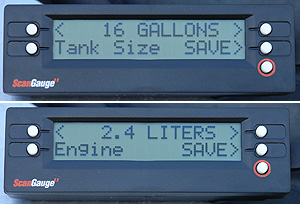 Setup and options. The first thing you need to do is to decide what units of measure you want - gallons (US or imperial) or litres and miles or kilometres. Once you've sorted that out, you need to tell it the size of your vehicle's engine and fuel tank capacity. This helps make the readings more accurate for engine-related measurements, and the fuel tank size is a requirement if you want the trip computer to work. In addition you also need to tell it whether you're using regular petrol or diesel or if you're driving an LPG or hybrid vehicle. Finally you can choose one of the eight pre-programmed screen background colours, or create your own so that it perfectly matches the existing dials in your car. All these settings are stored in NVM (non-volatile memory) meaning you can turn the unit on and off and not have to reset the values each time. There are a gajillion options in this thing that you can fine tune to your heart's content. Some are useful only to the über-geek, whilst others will be used by everyone. If you need to, you can fine-tune the device's readings by a certain percentage to account for speedometer inaccuracies or changes to standard vehicle equipment. For example if you have a wheel and tyre combination on your car which makes the speedometer under-read by 5%, you can enter -5% into the scangauge so it can compensate accordingly. I thought this was a nice option because it massively widens the number of people for whom this device could be useful, by opening up the aftermarket tuning scene as well as stock vehicles.
So how does it work? By being attached to your OBD II port, the scangauge can read a constant flow of data which is available to the engine management system, and present it to you on the screen. The list of standard items it can display is very comprehensive, and includes gas mileage, speed, engine rpm, throttle position, closed/open loop emissions control, voltage, air intake temperature, coolant temperature, engine load, intake manifold pressure to name just a few. Each item can be displayed in metric or imperial (depending on how you set it up initially) and in addition to the stock items, it has the ability to be programmed to pull other information off the OBD II port, operating in a mode called X-Gauge. This is a bit more geeky - you need to know four values - the TXD, RXD, RXF and MATH codes for a particular item. If you have that information to hand, you can tell the ScanGauge to submit that query code to the OBD II system and then listen for a response. For example, by default it does not show instantaneuous horsepower. Programming the correct codes in to one of the 24 programmable X-Gauge readings will return horsepower to that value and allow you to display it on-screen as a selectable gauge. Clever. Better still, Linear Logic maintain a constantly updated list of XGauge commands that you can refer to if you decide to get into adding new readouts.
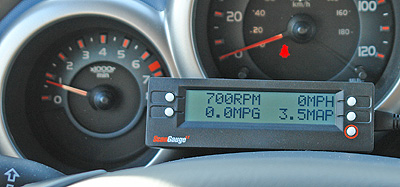
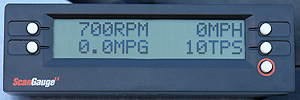 Gauge mode. In Gauge mode, the ScanGauge II shows four user-definable values on the screen at once. Pressing the button next to any of these items cycles them through the available items to view. If you select one and it doesn't give a reading (for example you just see 'VLT' instead of +12.6v) then it means the selection is not something your particular vehicle is transmitting on the OBD II port. The refresh rate for these values can be set in the setup menus, from normal to slow to fast. The correlation between the ScanGauge and the Honda for both speedometer and tachometer proved to be bang on. The photo below shows the rpm reading at idle with the device held in front of the car's own tachometer.
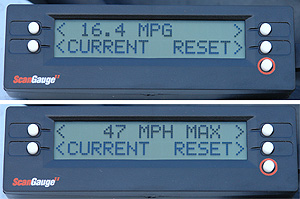 Trip computer.The trip computer mode is an interesting addition with this device especially for those of us who don't have rocket-science on-board computers in our cars (ie. normal cars, not roadgoing luxury yachts). Whilst it can't be 100% accurate because it has no direct knowledge of your fuel load, it's pretty damned close. Basically, each time you fill up, you go through one level of setup menu to the Fill Up option. The ScanGauge then assumes you have a tank containing the amount of fuel you indicated during initial setup - in my case 16 gallons. Because it can read gas-mileage and speed from the OBD II port, and because it has an internal clock, the device can then determine your estimated range-to-empty, the cost per mile and a whole host of other trip computer functions. As well as instantaneous readouts, it can show you overall averages, moving averages, and previous day or trip averages too. Whilst none of this will be news to anyone who's driving around in the aforementioned luxury yachts, the ScanGauge II does give the rest of us a lot more functionality than we have in our standard vehicles.
So can you rely on it? Well yes and no. Like I said, it has no direct knowledge of the fuel level in your car so it needs to assume you've entered the correct tank size, and filled it to the top. Part fills and incorrect tank sizes will skew the readings and make it inaccurate, so the human condition is the key variable here; the computer is only as good as the information you give it. Having said that, for the one tank I ran through during the test, it calculated my range-to-empty to within 5 miles of what I had estimated by hand. The average gas mileage was correct to within 5% of what I'd calculated too.
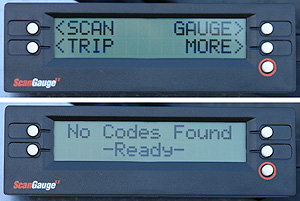 Scan mode. Scan mode is handy for some self-diagnosis of your vehicle. Most usefully, it will show you the 5-character error code(s) associated with a check engine light. From there it's up to you to sleuth out on the internet forums what a particular code means in relation to your exact vehicle.
It can pull these codes out of the OBD II system one at a time, and then if you choose, clear them. Clearing these codes in most cases causes the check engine light to turn off, but be aware that if you clear out non-trivial stuff, then any place you take the car for service isn't going to be able to see the history of stored codes. So this is a double-edged sword. For example if you're seeing a code for a faulty reading on an engine knock sensor and you clear it, whilst you know that error code existed, the next time your vehicle is serviced, the garage won't pick up on it (unless it happens again after you've reset the history). From that point of view, it's nice to be able to turn off the check engine light, but at the same time, if you don't know what you're doing it could lead to trouble.
Having said that, this can also be useful for determining whether there is any issue with your engine that is likely to flag an expensive repair next time around. A lot of the time, the diagnostic system will store away relatively trivial codes that do not cause a check engine light, but that will alert a technician next time they plug your car in during a service. For example a history of intermittent coolant overheating codes could point to a thermostat on the way out.
The test. I spent a weekend with the ScanGauge II mounted in the Honda Element, driving around town and up and down the mountains. Even in direct sunlight the display was nice and clear to read, and the sensitivity of the buttons was excellent - the lightest touch and they register an input. At night the display colour was easy to tune to the colour of the rest of my instruments although this is one item that seems missing : auto-dimming. The setup options allow you to tune the brightness of the backlight - dim, bright and off - but that setting is buried two menus deep. At night I found the bright backlight to be too bright - the dim worked better but I needed to pull over to fiddle with it and change the setting. I can imagine a fair number of drivers trying to make that sort of adjustment on the move and losing their concentration on the road. More useful would be a simple light sensor that could measure the ambient light near the gauge and adjust the backlight from bright or off (in the daytime) to dim at night if the driver wanted it to. It was a minor annoyance but one which would be nice to see on Linear Logic's wishlist of items for their next version.
As far as the scanner functionality goes, I managed to induce a P0440 error code for the emission control system by driving with the gas cap removed. This eventually caused the check engine light to come on as well (on my car) as a message that informed me to "check gas cap". When I scanned the OBD II with the ScanGauge, sure enough, there was the P0440 code. It was easy to clear and as I did so, the check engine light on my dash went off. Short of snipping the wiring to some other crucial part of the engine, I can't tell you how it would work with other error codes, but I've no reason to believe it would be any different.
Conclusion : geeky - yes. Useful - definitely.
Fitting the ScanGauge II to your car should be simplicity itself. A lot of people will make do with the self-adhesive velcro, but the more serious enthusiast will be able to mount it permanently. Having the two choices of cable position is a great idea, and the ScanGauge powers itself on and off automatically from the OBD port 12v power supply. Once it's mounted, you could find yourself altering how you drive, especially if you have the gauge mode showing you intake manifold pressure, engine load and gas mileage. This device will educate you extremely quickly as to why your vehicle gives you the gas mileage it does. You can find yourself trying different things to get that gas mileage figure up higher, and even if you're not particularly car-savvy, it will help to show you exactly how your right foot affects everything in the engine. Interestingly, having the throttle position sensor displayed will give you some clue as to how your cruise control works if you have one. You might not think it's doing much but that value will fluctuate constantly as the cruise system maintains your chosen speed.
The trip computer mode is very useful for people who don't have a trip computer in their vehicle already, and the scan mode is a good one for the home mechanic who likes to know a little more about the internal workings of their engine and the fault code reporting system. More often than not though, I suspect you'll end up driving around looking at gas mileage, speed, engine load and throttle position. And if that saves you some cash when it comes to gas mileage, that's always A Good Thing. My one recommendation : don't program in the XGauge for brake horsepower - you'll be sorely tempted to flog your car to within an inch of it's life to see how big a number you can get. And if the police see you doing it, that'll either be "street racing" or "excessive demonstration of speed" that will appear on your police record.
'Wearable' action / sports camcorders
There's a new breed of camcorder coming to the market - self-contained flash memory camcorders. Two of them tout their product as 'sports' or 'action' camcorders. The idea is simple enough - a compact, self-contained unit with a lens, CCD, microphone, memory card slot, some batteries and a set of rudimentary controls. I review the two contenders here.
GoPro Hero Digital Sports Camcorder
Tested January 2008 
Website: www.goprocamera.com
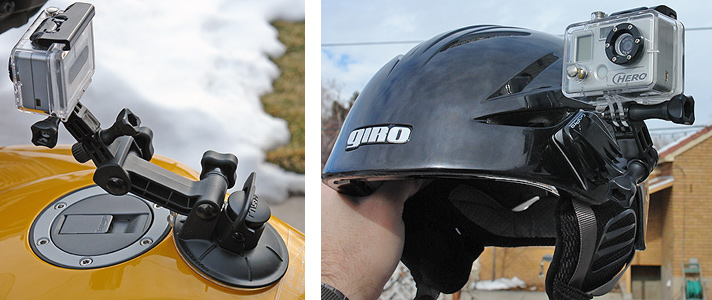
 Billed as a waterproof digital camera for sport, the Digital Hero was launched at the SEMA show in Vegas last in 2007. It comes in three flavours - wrist camera, helmet camera and motorsports camera. The three units are actually all the same - the difference is in the mounting kits that they come with. The wrist camera comes with a velcro wrist strap. The helmet cam comes with various helmet mounting options and the motorsports cam comes with a bunch of stick-on mounts and a suction cup mount. What differentiates the GoPro from the ATC-2K is the form factor (it looks like a mini digital camera) and the fact that it comes in a shockproof, bombproof, waterproof housing. To test it, I went skiing with it, and then used the suction cup mount to video footage from my motorbike. You can see samples of the bike test later in the review.
Higher resolution, more fps. One of the things I noted about the ATC-2K below is that the sensor is a 320x240 sensor that upscales to 640x480 for the video. The GoPro runs a 512x384 panel at 30fps so you get about 50% more resolution and double the framerate. Because of this, a 2Gb SD card will hold about 55 minutes of video with the GoPro compared to over an hour with the ATC-2K.
Playback, menus and transferring the data. The GoPro comes with a hybrid connection cable with an ultra mini proprietary plug on one end and a USB, audio and video connector on the other end. Plug it in to a PC and it shows up as a removable disk drive full of AVI and JPG files. It's USB 1.0 so transferring the data takes a while. Plug it into an AV input on your TV and you get to see the results played back instantly. The on-screen menu is a little cumbersome, as with the ATC-2K below, but it does a reasonable job given the camera only has two buttons.
The buttons are located on the front and the top of the camera. The front one is on/off and mode selection. The top one is shutter and mode entry. So to flip through the menu options on the built-in LCD screen, click the button on the front. To select an option, click the button on the top and so on. The LCD is actually upside down, which is a bit odd, but the camera was originally designed to be wrist-mounted, and once you understand that, it sort of makes sense. The various menu options allow you to output video at 50 or 60hz, NTSC or PAL, and to set up things like auto power off, remember previous shooting mode, and upside down mode. In upside down mode, you can mount the camera upside down and the video will be flipped so it's the right way up. Neat.
Mounting options and that case. There are a bazillion mounting options for the GoPro depending on the kit you buy. They also offer accessory kits for around $40 a piece which give you even more options. The Motorsports version I review here comes with a grab-bag of flat and curved mounting plates (for flat surfaces, or slightly curved surfaces like a helmet), thumbscrew connectors to join the various mounting arms together and a suction cup mount for window and car or bike bodywork. One thing to note. The supplied mounting plates come with double-sided 3M VHB tape. VHB means Very High Bond. Do not - I repeat do not stick one of these somewhere where you might regret it - like on to a painted surface. It will not come off without destroying the mounting surface. VHB tape is bloody strong and it's an inspired choice for a camera mount. For the trivia buff, VHB tape is 10 times stronger than rivets in a like-for-like bonding strength test. (Discovery channel clip about testing VHB tape). The clear plastic case that you fit the camera into looks quite well constructed too, with a lever-action clasp on top to hold the back plate shut, compressing a sealing o-ring to keep water and dirt out.
Stills, video and sound. The GoPro takes 3MP still photos - pretty reasonable ones - and it can be set to do single-shot, three-in-a-row, or time-lapse one shot every 5 seconds. Obviously it also shoots video with sound. There is a menu option on the camera to set the audio sensitivity of the microphone to high or low. In low mode, it's tuned to engine sounds. In high mode, it's less muffled and designed for less noisy environments. In my test, I forgot to set it to high mode when skiing, which made the sound very muffled. On the motorbike, in low mode, it picks up the sound of the engine beautifully. It's only marred by the fact that on my bike it also picked up a lot of electrical interference from the alternator or one of the spark plugs. It manifests itself as a constant buzzing on the soundtrack. Bummer. When the weather warms up, I'll try it again mounted with a little RF screen around the camera to try to isolate it from the electrical noise to see if I can get better results.
The video does suffer the same vertical 'wah wah' type effect as the ATC-2K below, but it's nowhere near as pronounced and it takes a good sized bump in the road to make it noticable. I think the extra framerate helps this out, plus the resulting video does give more of a sense of speed. This example shows some clips from my road test. The black thing on the left of the video is my GPS mount which was in the way.
Heed the battery warning! One of the slips of paper that comes with the GoPro, there's quite a strong recommendation that you don't use alkaline batteries in it. The current drain of the GoPro is a lot more than the ATC-2K below, because the CCD is larger, and in cold weather, alkaline batteries just don't cut it. I tested the GoPro with alkaline and the recommended Lithium batteries. On a 4°C (40°F) day in January, attached to my motorbike, the alkaline batteries died in 7 minutes. They went from 1.65v new, to 1.37v after 7 minutes. That's below the power threshold for the GoPro and it just shut down. Doing the same test with Lithium batteries revealed a voltage drop from 1.75v new to 1.66v after 50 minutes of filming. With the lithium batteries, 30 minutes of filming was done skiing in -3°C (28°F) temperatures. Okay so that's down there in terms of filming temperatures, but the GoPro is billed as a sports camcorder and it does lay claim to being useful for skiing and snowboarding. So my recommendation : Lithium batteries, or rechargeable NiMh (nickel metal hydride) batteries are what you want.
A couple of items missing from the manual. There are a couple of details missing from the instruction sheet which are worth knowing with the GoPro.
(1) Even if the camera is set to 'remember' the previous mode it was in, if you connect it to a PC via USB to pull the videos and photos off, the next time you turn the camera on it defaults to single image photo mode again. If you use this camera, you need to double-check the shooting mode after a USB connection.
(2) To connect via USB, plug the USB into the camera when it's turned on, then connect it to the PC. If you plug it in first and then turn it on, you'll get a generic device failure message and the camera won't be properly recognised.
These are minor irritations but nothing to cry about. Once you've come across these issues once, you tend to remember next time.
Conclusion : A worthy contender
In a like-for-like test, I'd have to go with the GoPro over the ATC-2K. I found it easier to use and a lot easier to line up when using a helmet mounting option. The video seems clearer, the sound is a little better and it takes 3MP stills too which is a bonus. The video still has distortion when used on a vibrating surface, like a motorbike, but I think that's an inherent issue with this type of device. Short of a vibration-isolating platform, or in-camera vibration cancelling, I'm not sure there's anything you can do about it. But compared to the ATC-2K, I found the effect much less pronounced in the GoPro.
ATC-2K / ATC2000 ActionCam
Tested October 2007 
Website: www.oregonscientific.com
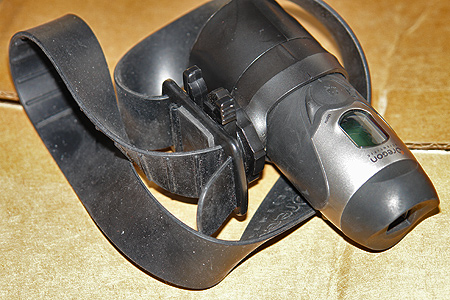 Second up is the ATC-2K; a followon to the ATC1000 - also a 'wearable' sports camcorder. Unlike the GoPro, the ATC-2K has a tube form factor with the lens at the front and the batteries and connectors at the back, with the LCD and buttons on the top. To test it, I attached it to a friend's motorbike handlebars using the supplied mounting kit, and got him to shoot some video of me during a motorcycle trip in late 2007. You can see the video later in the review. Like the GoPro, the ATC-2K has a small amount of memory built-in, but it's so small you'll want the 2Gb SD card again. The camera comes with a rubber helmet strap, a quick-release bracket, a handlebar clamp, a USB cable and an A/V cable. The helmet strap allows a lot of wobble once the camera is mounted, because there's no permanent mount like there is with the GoPro. Plus the camera is quite hefty so once it's perched in it's quick release bracket, there's a lot of mass to wobble about and stress the rubber strap. The controls are pretty simple again - on/off and record/stop. The rear cap is a waterproof, o-ring sealed affair that you screw off to get at the batteries, SD card slot, USB and A/V connectors. The spec for this camera is video at 640x480 but the results look like they're 320x240 upscaled in the camera. An examination of the resulting video files shows they're running at 15 frames per second which is OK, but not stellar. The lower sized LCD panel and lower framerate do mean you can get more video on to a 2Gb card than the GoPro though.
Playback and connectivity. The easiest way to get the videos out of the ATC-2K is to attach it to a PC using the supplied USB cable. Once connected, it shows up as a removable disk drive and you can just copy the videos over to the PC and play them back. Unlike the GoPro, it doesn't seem as sensitive to the connection and power on/off order. There is an option to use an A/V cable to connect it to a TV for direct playback. This works reasonably well but the on-screen navigation is again a little cumbersome and basic. But then again, the camera only has three buttons on it so there's a limit to how much functionality you can achieve with those limits.
No viewfinder. As with the GoPro, there is no screen to preview what the camera is looking at. The real problem here is that there's not even a viewfinder to give you some idea. This leads to a certain amount of guesswork when mounting the camera because you're never entirely sure what it's looking at. For a motorbike or car, it's not so difficult - point it level and straight and you're pretty much set. For using it on a helmet though, the results are considerably harder to predict. I did shoot some skiing footage in January 2008 but after three attempts, each time I ended up shooting the sky or the tip of one of my skis because I just couldn't get the alignment right. So that's a definite drawback for the ATC-2K.
 Recessed lens - hard to keep clean. In the ATC-2K, the lens is recessed quite noticably into the unit itself. When skiing, this recess filled with snow very quickly, but I didn't realise until I got home and played back an hour of fog. When using it on the motorbike, we got dead bugs stuck in the recess frequently and because of the design, it's bloody difficult to get them out and to clean the lens cover.
Can you shout that again? I have a real issue with the audio on the ATC-2K - it's almost none-existant. The example video here has a nice engine and wind sound to it, but when you take the ATC-2K in to a quiet environment, like skiing, or filming from inside a vehicle, the audio is imperceptible on playback. I tried videoing a narrated commute home one day, and all I got was the rattling panel in the front of my dashboard. My entire narration was there, but I had to crank the volume up to 11 to hear it, by which point, the rattling panel sound was like Concorde crashing into my house. Unlike the GoPro, there is no audio sensitivity option so it's loud, or nothing. On the plus side, the ATC-2K doesn't seem to be as sensitive to electrical interference noise, so my noisy alternator might not be a problem with this camera.
Video distortion. Finally, and perhaps most annoyingly, he ATC-2K has no vibration or shockproofing. When used on the motorbike which had high frequency vibration coming through the handlebars, the ATC-2K suffered from a terrible vertical 'wah wah' picture distortion. You can see it in the example video. The picture constantly stretches and squashes vertically, and it seems to lose framerate too. You'd never know it from the video, but we were doing well over 80mph on that road yet on the video, with the missing frames and picture distortion, it looks like we were out for a 30mph afternoon ride. The GoPro has the same issue but it's markedly less apparent. This is the sample ATC-2K video:
Better battery performance. One area the ATC-2K does win out over the GoPro is battery performance. Because the power requirements for the smaller LCD panel are less, it does better in cold weather shooting. In my test, with alkaline batteries, the ATC-2K got about 18 minutes of shooting to the GoPro's 7 minutes. The voltage drop was about the same: 1.65v down to 1.35v in 4°C (40°F) weather. Again, once replaced with lithium batteries, you'd probably run out of memory card space before battery life became an issue.
Conclusion - the not-so-action cam.
I've given this product two to three stars because if you use it for basic videography, it's not bad. However, if you use it for what it's advertised for - sports and action videography, it's not really up to snuff. The image distortion in motorsports is really irritating and the recessed lens design is just plain bad. The audio pickup is dodgy unless you're shouting or videoing something suitably noisy. I suspect these wrinkles will be ironed out in due course with later designs, but for now, I'd give this a miss.
Comparison
| GoPro Hero | ATC-2K | |
|---|---|---|
| Video resolution | 512x384 native 30fps native |
320x240 upscaled to 640x480 15fps with frame-doubling to 30fps |
| Form factor | Rectangular mini cam | Tubular 'bullet' |
| Memory card | Up to 2Gb SD card | Up to 2Gb SD card |
| Video in minutes | 56 mins / 2Gb | 70 mins / 2Gb |
| Waterproof | 30m / 100ft | 3m / 10ft |
| Shockproof? | Yes | Yes |
| Batteries | 2 x AAA | 2 x AA |
| Price when tested | US$139 / US$169 / US$179 depending on version |
US$129 with free 2Gb SD card |
TomTom Go 510 GPS Navigator
Tested August 2006
 By 2006, GPS navigation devices have come a long way since their earliest incarnation, and I decided to research the available models. I settled on a TomTom Go 510 device, despite some of the published problems people have been having with it. More on those later though.
The TTG510 is the lower-spec version of the TTG910. In Europe, the model is known as the TTG710 simply because it comes with a different map set. Whereas the TTG910 has an 20Gb internal hard drive and can display pictures, play MP3s and speak the actual road names, the TTG510 is a base model without the frills that stores its maps on SD cards. The operation of the 510, 710 and 910 versions is identical in their user interface. In America, the TTG510 is supplied with a 1Gb SD card with all of America, Canada, and oddly, Guam on it. My test was during a business trip to Nebraska which was a good test for two reasons. Firstly, I'd never been to Nebraska before so had no idea of any locations. Secondly, in the summer, when I went, the temperature was a hot 35°C outside but more importantly, the humidity was at about 85%. Going between this environment and air-conditioned cars and buildings was a great test of the durability of the TTG unit and it didn't once suffer from humidity or condensation-related problems.
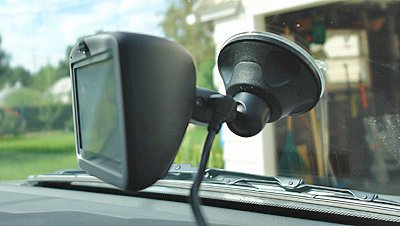
So what about the unit itself? Well it's a nifty little widescreen device with a touch-screen interface. It comes well-packed with a charger/docking station for your computer, a 12v adapter and suction cup mount for the car and a little carrying pouch. The pouch is nicely designed because it has a stiffened side where the screen goes to further protect the screen from sharp objects poking through the pouch itself. One design flaw of the TTG becomes apparent as soon as you use the pouch though - the position and design of the power switch is exactly where you'd hold the device to put it in and out of the pouch. Three times I've accidentally turned it on as I've put it away only to find it warm and with dead batteries next time I've come to use it. D'oh! For a $599 GPS navigator, you'd think they'd have done a better job!
The computer charger/docking station works just fine and if you buy one of these, I recommend using the included backup software. TomTom do not provide source maps for the TTG510 on a CD or DVD - the only place they exist is on the SD card. Because TomTom maps need to be activated on the device they're being used on, if you end up with a corrupted card or worse, you won't have any way to re-install the maps or activate them at the TomTom website. You've been warned.
In-use, the device is simplicity itself. It has a SiRFStar III GPS receiver in it which locks on quickly once it's done it once. For example once it's located you, if you turn the unit off and then turn it on again the next day near the same place, it locks on within about 20 seconds. If you fly somewhere else and then turn it on, it's last "known" set of satellite locations is wrong so it takes longer to relocate itself. The GPS receiver is pretty good and worked remarkably well indoors - previously a no-no for GPS receivers. Entering a destination is a breeze, either by giving it a street address, a point of interest (POI) or a street intersection. It calculates the route very quickly and you're ready to go. (You have the choice when planning the route of fastest, shortest distance, avoid motorways etc - plenty of options.) You can navigate through a traditional 2D map, but the 3D display is by far and away the best way to do it.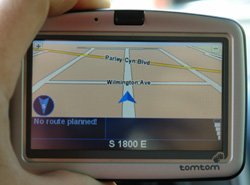
 It gives a display which is far more intuitive to read because it resembles the road layout you can see through your windscreen. The LCD screen on the TTG510 is brighter than that of the older models and is covered with a glare-resistant coating which makes it totally useable in bright sunlight - something of a novelty for an LCD device. One point to note : the TomTom screen is also readable through polarised glasses - something I've had problems with on the Garmin units before.
As you drive, a user-selectable voice (in plenty of different languages and variations) tells you where to go. Some of the nomenclature takes a little while to get used to, for example "Ahead, turn left" doesn't mean "take the next left", but rather "be prepared to turn left somewhere up ahead". When you get to the actual turn, the instruction is simply "In 100 metres, turn left" followed by "Turn left". (It's worth noting that the TTG910 - the high-end version - has text-to-speech ability built-in so it will attempt to pronounce the name of the road too. For example "Turn left into Acacia Avenue".). Whilst en-route, the TTG will recalculate almost instantly if you take a wrong turn or miss a turn, and you also have the ability to tell it to avoid certain parts of the route entirely, for example if a road is undergoing construction.
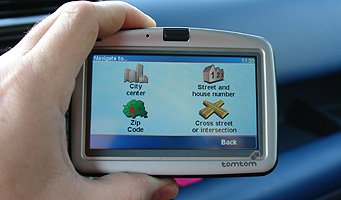
The menu system of the TTG is really easy to use and has a nice up-to-date feel to it. There are two modes - basic and extremely verbose. In basic mode, a lot of the less well-used options are simply hidden away from you but when you activate the "show all options" option, you end up with screen after screen after screen of things to twiddle, tweak, poke and tune. Some seem a bit odd when you first look at them, but after using the device for a while, you'll begin to understand why there are so many options. One of the best ones is the ability to change the mapping colours. If you don't like the ones shipped as default, there is a choice of five or six alternatives, plus three or four alternative "night mode" mapping colours. The night mode is a neat feature in itself - the TTG510 has a light sensor on it and when it gets dark, the maps all switch to low-intensity, low-contrast maps so as not to blind you when driving at night. A neat touch.
The Point Of Interest (POI) capability is neat - basically shops, restaurants, cash machines etc all reside in the POI database. This is where the TTG loses a little of its shine because being a European company (Dutch, actually), the POI database for America is a little out-of-date. The major items are all there, but for example, the hotel we were driving to from the airport had its old name in the TTG POI database. You can download POIs from the internet from all manner of things from fishing spots and speed camera locations up to user-created databases of all the locations of a particular hotel chain. You can also input your own POI using the TTG510 either from where you are right now, or by browsing the map in 'offline' mode.
 Something else which has been moaned about on various internet forums is the mapping database for America. A lot of people have complained that it's massively out of date. For new developments and roads, it might be. TomTom use the TeleAtlas database which is better at European mapping but in my tests I was using long-established routes and roads and it didn't miss a beat. (Garmin use the Navteq maps which are great in America but suffer the same mapping complaints in Europe as TeleAtlas do in America)
And so to the suction cup mount. Well what can I say that hasn't been said a thousand times on a thousand forums all over the internet. Actually, for the most part, I've not had a problem with it. My stock factory item holds my TTG510 well enough and has yet to fall off the windscreen or suffer the droop problem so many people have complained about. So from my experience, it's not so bad, but that's just me. To be safe, I've taken TomTom up on their current offer of free replacement mounts for those with the older mount in the box. The new one has a better ball-and-socket joint to attempt to counter the droop problem, and a little nubbin on the back to help prevent the rocking / power disconnection problem some people have reported. I'll not go into it in depth here, just simply give you a Google link to check out. Google search for 'TomTom 910 windshield mount'
So why did I give this little unit only 4 out of 5 stars. Well I took off 1 star for a combination of the following - the reported mount problems, the dated POI database, and the power button location and design. Apart from that, I love the thing. It got us everywhere we needed to be, on time and without getting lost, in a city I've never driven in before.