The car Bibles product reviews: Accessory devices / servicing items.
![[product reviews]](images/productreviews.gif)
Signal Sorcerer traffic light changer
Tested September 2006 
Website: www.signalsorcerer.com
 There are plenty of devices and gizmos out there designed to entice the impatient driver with the allure of forcing traffic lights to be green in their favour. They fall into two categories. In the first and illegal category, there are devices like infra red blasters and emergency vehicle transmitters. These both work on the same principle - either an infrared or a radio signal is sent out from the vehicle. Traffic lights at the next junction will receive the signal and force the current cycle to drop into emergency mode where all the lights are changed to red except for those for the approaching vehicle. System designers assume these vehicles to be emergency vehicles, and facilitating their progress by stopping all traffic at a junction is A Good Thing. But not all devices are on emergency vehicles; they've started to find their way into the consumer world. They're expensive, they're illegal and expect to go to jail if you're caught with one.
Fortunately for all of us, the Signal Sorcerer falls into the second, legal category of traffic-light changers. To understand how the Signal Sorcerer works, you need to understand how traffic lights work. Generally speaking, they are either controlled from a central control centre, or more often, local control boxes (the little grey box at every junction). Depending on the time of day, the lights will operate in a fixed pattern designed to allow the maximum flow of traffic. For the less-used paths through the junction, inductive loops are buried in the road. These are loops with a weak electric current in them which generate a magnetic field. When a car passes over them, the field is disturbed and the traffic lights "know" a vehicle is now waiting in that lane. Typically, this is a left-turn lane, or if you're in England, a right-turn lane. When the traffic lights detect the presence of a vehicle, the cycle changes to allow a green light for that lane, thus allowing you, the hapless driver, to turn across the junction. The principle is sound, and it works really well. Sort of. To paraphrase George Orwell, "All vehicles are created equal but some are more equal than others". You see the problem is that inductive loops work exceptionally well when hulking great chunks of steel drive over them. Like cars built in the 80's, trucks, buses and so on. Even today, the buzzing, noisy lump of pollution in the front of a car (the engine) has enough steel in it for these inductive loops to work. The problem is motorbikes and ultra-modern sports cars, and to some extent, newer sedans. There's a lot of aluminium in these things now and less and less steel. This is especially true on motorbikes - essentially a collection of plastic, carbon fibre and aluminium. This presents a problem. The traffic light's inductive loop often doesn't pick up motorbikes. I ride a motorbike, I know. There are some junctions around where I live that never detect my bike. I have to sit there like an idiot staring at a red light waiting for a car to come along behind me and trip the cycle of lights. Worse, if it's late and there is no other traffic around, I have to shoot a red light, or do a bizarre series of right turns and u-turns to get where I want to be. It's bloody ridiculous, and anyone who rides a motorbike will bear me out on these experiences.
 So it was with keen interest that I received a Signal Sorcerer for review. Their website is flashy and has tantalising claims about all your greenlight dreams coming true for $20. I read up on the device and the theory seemed sound enough so I decided to give it a go. Basically, the Signal Sorcerer is a really strong magnet housed in a weatherproof plastic case. The idea is simple. If you attach it to the bottom of your vehicle - in my case my motorbike - and drive over an inductive loop, the strong magnetic field is enough to disrupt the inductive loop into registering your presence. Sort of like Darth Vader and the old "sensing Luke" trick, only with magnets. The idea, then, is that it gives you the presence that your bike is missing, and so rather than sitting there waiting at the endless red light, you'll trip the system and a green light will be forthcoming in due course. And on you go.
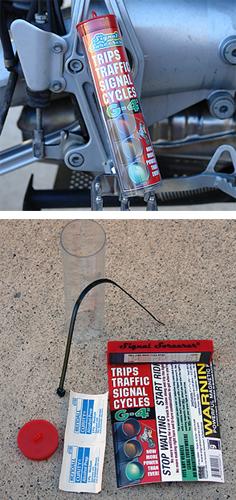
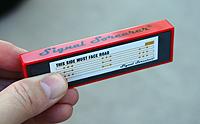
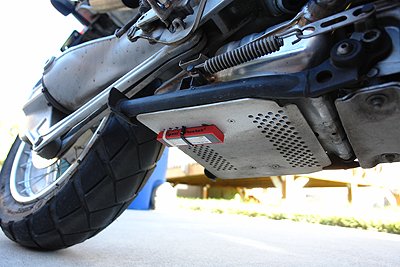
The packaging is pretty simple - a plastic tube with a paper instructional insert, the magnet, two alcohol swabs and a zip-tie. The instructions are straightforward; clean the area where you're going to put the Signal Sorcerer with the alcohol swabs, peel off the protective backing from the sticky stuff and stick it in place. The zip-tie is there for added security to back up the sticky stuff. The idea is sound, and on most motorbikes I can imagine it works well. The ideal place to stick this thing is on a lower frame rail, as close to the road as possible. My problem was that my bike has skidplates on the bottom - aluminium ones at that. The magnet had nothing to stick to so I was reliant on the sticky stuff to hold it in place. No matter, I cleaned off the only place I had available - the bottom of the centrestand - peeled off the protective backing and stuck the unit in place. I secured it with two zip-ties just to be sure. You can see it nestled under my centrestand, stuck to the skidplate in this photo:
The road test
At the risk of boring you stupid, I'll mention one junction that's my favourite for staring at a red light. This will mean nothing to you unless you live in Salt Lake City and own a motorbike, but westbound Bangerter Highway turning left on to southbound Redwood road. I have gone through that left turn light on red more times than I can remember. Without fail, it never sees my bike. Seemed to me to be the best place to give the Signal Sorcerer its first test. I cruised to a stop at the front of the line with no traffic behind me and waited to s.....what the? A green arrow? Fumble the clutch, crunch, stall the bike. It was so unexpected I muffed it. One quick recovery later and I was off. Well that was an excellent start. I looped around and back and did it again. Again, a green arrow as the cycle came up. Wow! The rest of my roadtest was basically much the same. I found all the lights that never normally see me, and they all tripped their cycles and gave me a green light in due course. I was duly impressed. I did my road test more of less in the dead of night to ensure I was the only vehicle around. That way I wasn't ever in a situation where a car came up behind me and tripped the light sequence.
 What Signal Sorcerer won't do. If you buy one of these expecting to cruise up to a red light and have it magically turn green, you'll be disappointed. That's not what it does. It merely ensures your vehicle is seen by the traffic light inductive loop, so that the signal order will be tripped to include your lane in the next cycle.
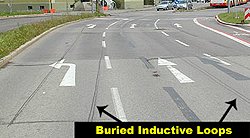
Where Signal Sorcerer won't work. Not all traffic lights use inductive loops to detect traffic. Some work on reflected light detection and others are simply run off timers with no way of influencing them. You'll know if you've found a timer-driven light. You'll be sitting at a totally empty junction in the dead of night for 5 minutes at a red light with no other traffic. The picture on the right shows a typical inductive loop setup - they're buried in the road surface and the cuts are filled in with hot tar giving a tell-tale rectangle or circle 'drawn' on the road on the runup to the lights.
Conclusion - it works.
If you've had problems with your motorbike or lightweight sports car, or even your sedan not being detected by inductive loop traffic light systems, this certainly seems to do the trick. Don't buy one expecting miracles, but go in with the knowledge that you'll stand a far better chance of being an 'equal' at the traffic light grand prix next time.
PressurePro TPMS
Tested August 2006 
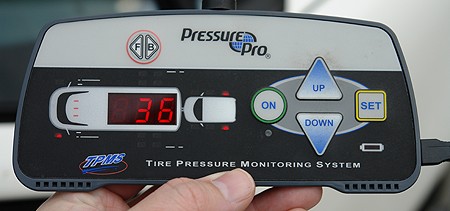
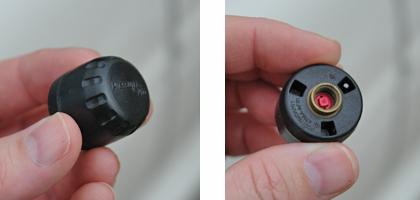
I had a chance to get 'hands on' with the PressurePro system in August 2006. The system is composed of two parts - the sensors themselves and the in-vehicle reporting unit. The sensors retail for arouns $50 each and the reporting unit runs about $200 so for a regular passenger car you'd be looking at a $400 shell-out. PressurePro sell mainly to the trucking and RV markets right now, and the unit I had to test was, as you can see from the photos, an RV unit. PressurePro have struck deals with a couple of RV manufacturers who are equipping their vehicles with the PressurePro system and connecting it to the RV central display / monitoring device via RS232 connections. The sensors themselves are quite large and weigh in at about 14 grams. If you were going to fit these to your vehicle, I'd recommend you get your wheels and tyres balanced afterwards just to be safe. With the system powered on, the display initially reads "No Sensor" for each position on the vehicle. In my test, the unit was an RV system and capable of monitoring 16 tyres. I set it up so the front two sensors were set as the front two wheels on the RV, and the rear two were set up as the trailing tyres on the towed vehicle. Using the up and down arrow keys, you select the appropriate position for the sensor you're going to install, and screw the sensor on to the valve stem. After about 4 seconds, the display changes from "No sensor" to a numerical display of the tyre pressure. That becomes the baseline pressure for that sensor. It will trip warning when the pressure drops 12.5% below the baseline, and again at 25% below the baseline. Setting up the sensors and the in-car unit was a snap and for the test, my vehicle was a rental car. As it happened, within 6 miles of leaving the rental counter, the PressurePro system beeped and the right-front LED started flashing on the display unit. It turns out the rubber in the valve stem had perished and was leaking and the sensor detected the drop in tyre pressure and alerted me, exactly as it should. Frankly it was a far better test than I'd been planning. My idea had been to drive around for a while, the stop and unscrew a sensor, thus giving it a zero reading. I did this anyway, and it took around 4 second from unscrewing the sensor to the in-car unit alerting me to a problem and flashing "00" on the display. That seems like a long time in a static test, but in reality, it's no time at all if you're driving. The car version of the display unit looks similar to the RV version I had to test only it doesn't have the RV graphic on it, and the F/B button is missing. On the RV versions, that button can be used to temporarily disable the readings from either the front or back vehicle. For example if you were to unhitch the towed vehicle, you'd only want the unit to look for readings from the front vehicle. If you didn't, when you got more than a couple of metres away, all four readings from the towed vehicle would error with zero readings because they'd be out of range. Speaking of 'out of range', the little aerial on the top of the display unit can be removed and replaced with a 35ft coax extension with another aerial at the far end. For particularly long RVs or trailers, this allows you to place the receiver antenna further back along the vehicle to ensure a strong signal from all sensors.
 So what do I make of this system? Well from model year 2007 onwards, all SUV and truck class vehicles in America must have a tyre pressure alerting system. These systems must alert the driver when any tyre drops 25% below its target pressure. The systems can be as simple as a flashing "there's something wrong" light up to elaborate systems like the PressurePro which show the tyre in question and give you a pressure reading. So my take on it is this; if you're buying a new vehicle and it comes with one of these systems, you can probably pass. But if you've already got a vehicle and you want an aftermarket system, this seems as good as any. The nice thing is it requires no technical knowledge or electrical or bodywork modifications to fit. It ultimately comes down to two things : relative cost, and percieved safety. $400 for a system like this on a passenger vehicle might seem expensive compared to the cost of fitting out a $100,000 RV with the same system. But as Ford proved with the exploding tyres problem on their Explorer, your perceived safety will evaporate very quickly when a tyre blows out at speed. As a plus, because of the design of the PressurePro, it is 100% portable - you can take it from vehicle to vehicle so it could easily be a one-time expense that you can take with you as you go through your vehicles.
Is it worth $400 to you to fit a system like this before you get into trouble? Or do you want to take it in the bank account in the event of an accident? The PressurePro system, like all TPMS systems, is ultimately like car insurance. It's a pain in the arse to pay for it up front because you might never need it. But if you have an accident and don't have insurance, then $400 seems really cheap in comparison. If you're strict with yourself and check your pressures regularly, then you probably don't really need a TPMS system. But as with so many products, here they're catering for human frailty, because in reality, how many drivers (who aren't car nuts) ever check their tyre pressures?

Michelin Digital Tyre Pressure Gauge
Tested July 2006 
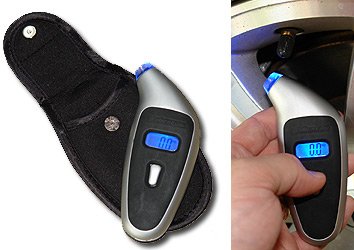
This is part of Michelin's new line of automotive products which came out in 2006. Given that they've been in the business of selling tyres for ages, it seems like the question surrounding their new product line is "What took you so long?". This review goes hand-in-hand with the new digital tyre inflator below. At the time of writing, this new pressure gauge cost $19.99 from motoring parts stores. It comes in a vacuum-wrap plastic display box with a small window in it for people to 'check out' the display by pushing the button. My first piece of advice - get one from the back of the rack. The front one will likely have been hammered by ham-fisted patrons for weeks if not months before you get to it. The gauge itself is nicely built and quite weighty. It's made of what feels like billet aluminium with rubber inserts for grip. The inserts are a particularly sticky compound so if you put it down on the garage floor, it will come up covered in muck. It comes with an expanding neoprene pouch that contains the instructions, and an adapter for certain types of bicycle valve. The adapter is a small brass unit which has no place to store it in the pouch other than loose, and when you do, it can scratch the silver finish on the pressure gauge. The instructions are pretty simple and once you've used the unit once, you'll likely not need them again. It comes with three batteries pre-installed and has an error of +/- 1psi up to 50psi.
It's really easy to use. Click the button and the LCD display lights up blue with black digits, and the collar around the nozzle lights up a similar blue - a nice feature if you're in a dark corner. Click the button to cycle through three pressure units - PSI, Bar and kPa. Slot the nozzle on to your tyre valve for a couple of seconds, pull it off and take a reading. Simple. The nozzle itself has a snug collar in it so it's easy to locate on the valve stem, and helps prevent you from accidentally letting air out of your tyres whilst taking a measurement. After 90 seconds of inactivity, the unit shuts off. Apart from the lack of place to put the brass adapter and the super sticky rubber inserts, it's a nice gauge to use. I removed half a star from my rating for the lack of storage for the brass adapter and the over-sticky rubber inserts, and another half because it's nearly impossible to use this gauge on motorbike tyres due to its design. The shape of the handle is great for testing car tyres but the angle it needs to attach to the valve stem means it interferes with spokes or brake discs on motorbikes.
I tested it against the digital inflator, as well as an old stick-type pressure gauge and a quality analogue gauge which I have calibrated every 6 months. At 40psi, the stick gauge reads 39psi and Michelin's digital pressure gauge reads 40.5psi so its well within tolerance, and it matches the inflator tested below.
Michelin Digital Tyre Inflator
Tested July 2006 
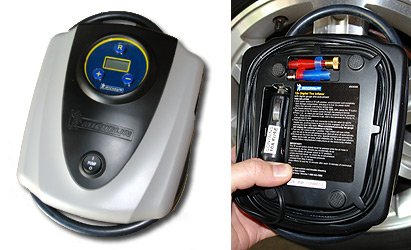
This is also part of Michelin's new line of automotive products which came out in 2006. I tested this in conjunction with their new pressure gauge, above. At the time of writing, this inflator cost $29.99 from motoring parts stores. It comes in a medium quality cardboard box and will likely have been opened and looked over a few times before you get to it. It has a long power lead with a 12v adaptor on the end which stores neatly underneath the unit, and a good-quality rubber hose with a clip-on style valve adapter on the end of it. The hose wraps around the outside of the unit when not in use. Underneath there are recesses containing a couple of adapters for footballs and bicycle tyres. The instructions are a 4-page booklet. The instructions themselves take up about 2 line inches and are reproduced on a label on the bottom of the inflator. The rest of the booklet is consumed with (basically unnecessary) warnings and notices. The top of the unit has an on/off rocker switch at the bottom, and three buttons at the top surrounding a digital display. The top button has an 'R' on it. This is the reset button - hold it down for three seconds and it resets the device to zero. It doesn't mention this in the booklet and if you do this whilst the inflator is connected to your tyre, it will recalibrate the gauge to believe the current tyre pressure is zero. Be warned! The other two buttons are a '+' and '-'. In use, you plug the unit in to a 12v supply and the display lights up blue with black LCD figures. Press the 'R' button to cycle through the pressure units, same as the gauge reviewed above. Use the '+' and '-' buttons to set the desired pressure, starting at 30psi and working up, and once you're done, the display resets to zero. Attach the clip-on nozzle to your valve stem and the display reads your current tyre pressure. If its below the pressure you tapped in to the inflator, when you turn the inflator on, it will start pumping up the tyre until it reaches your desired pressure, then cut off. The first unit I had didn't cut off though - it must have been a dud because it just kept on going. The second unit worked just fine. Don't be alarmed if you're watching the display and it goes up to 1psi above your chosen pressure; once the pump cuts off, it will read correctly. I think the pulsing of the pump causes the reading to be too high whilst it's running. This doesn't seem to affect the cutoff feature though. The noise when the unit is inflating is pretty loud. I guess they're using an RS540 electric motor attached to a meaty one-way valve, and if you leave it on the floor, it will vibrate around and 'walk' off to the extend of the rubber hose if you let it.
Something weird happens with this unit though - both my test units had the same issue so I think it's a design 'feature'. Once it gets hot, the unit can over-read by as much as 10psi. This means that if you leave it to inflate something, it will underinflate it by up to 10psi. I noticed this first when I took the nozzle off the fourth test tyre and connected to nothing, it read 2psi. I reset the unit and it zero'd out and after a moment, went back up to 2psi. Then 5psi. I let it cool off for 5 minutes or so, and it read zero again. There is a warning in the booklet about letting it cool off for 10 minutes after any 'inflation activity' and I guess this is why. You need to be careful then - if you do all four tyres in one go, by the time you get to the last one, you could be off by as much as 10psi. For that reason I took half a star off my rating, with another half removed for the inability to deflate overpressurised tyres. You have to do that by hand then re-check the pressure. I finally took another half a star off for the initial dud unit. In this day and age, it ought to be possible to buy something like this that works first time.
I tested it against the digital pressure gauge, as well as an old stick-type pressure gauge and a quality analogue gauge which I have calibrated every 6 months. At 40psi, the stick gauge reads 39psi and Michelin's digital inflator reads 40.5psi so its well within tolerance, and it matches the pressure gauge tested above.